
How to set up encrypted storage on Amazon EC2
Our Goal for Secure Cloud Storage
Let's see how to create a remote and secure data storage unit with high data availability, integrity, and confidentiality. The availability and integrity are provided by Amazon, while the confidentiality is provided by the cryptography explained here. I assume you know at least a little about what Amazon EC2 (Elastic Compute Cloud) instances and Amazon EBS (Elastic Block Store) volumes are, and that you have an Amazon Web Services account already.
I also assume that you want to do this with Linux. Windows EC2 instances cost about 50% more, are much slower to deploy, and we can get better file system performance with Linux.
AWS EC2pricing AWS EBS
pricing
The cost is certainly pretty good: US $0.10 per GB per month for storage, plus US $0.0052 per hour during the time we're have a nano instance running to access our data.
This page has details of Amazon EC2. You can do the same thing on Google Cloud and Microsoft Azure, and in-house. There is no need to do this at a cloud provider. I'm just showing you multiple things on one page. With multiple partitions on your MicroSD card or external storage, you could do this on a Raspberry Pi.
Amazon
ASIN: 0596515812
Amazon
ASIN: 1119138558
As for the availability, or the durability or reliability as Amazon also refers to it, Amazon predicts an annual rate of complete volume loss between 0.1% and 0.5% on EBS. Compared to an annual failure rate of about 4% for commodity hard disks, that's quite good. Periodic snapshots mirrored across multiple Amazon sites using their Glacier service can further increase the long term availability.
Let's Get Started
Below is an overview of what we will do. Follow the numbered steps and refer to the diagram for a quick initial overview:
- Deploy an EC2 Linux instance and an EBS storage volume in the same Availability Zone.
-
Attach that EBS volume.
It will appear as either
/dev/xvdfor/dev/sdf. -
Create encrypted block storage on that device,
using the
cryptsetupcommand. -
Access that encrypted block storage through the
device mapper, so it appears as if it were the
device
/dev/mapper/storedev. This can only be done if you know the symmetric key used to create it in the previous step. -
From this point forward, we can treat
/dev/mapper/storedevas if it were any block storage device. The dm-crypt kernel module transparently encrypts and decrypts all I/O. Create a file system on this device. -
Mount that file system as
/secureand use it like any other Linux file system. The kernel will be transparently encrypting and decrypting all I/O. - When you have uploaded your sensitive data, unmount the file system and flush the symmetric key from the kernel. The EBS volume is encrypted for long-term storage.
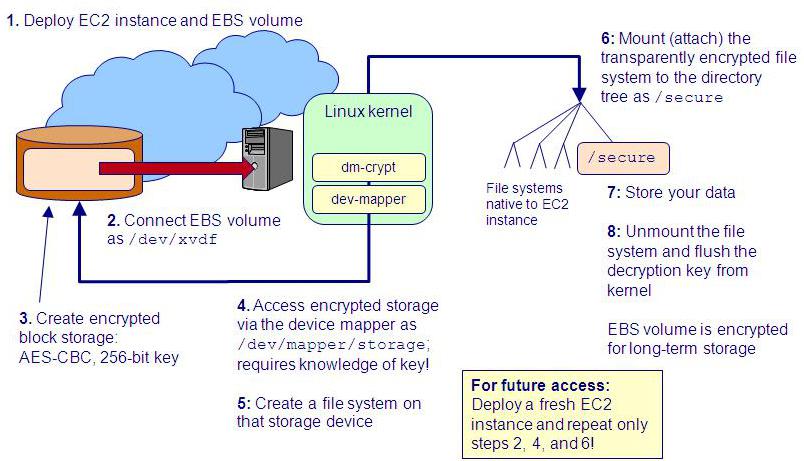
Future access just requires deploying a fresh EC2 instance and repeating only steps 2, 4, and 6 above.
Here are the steps in detail:
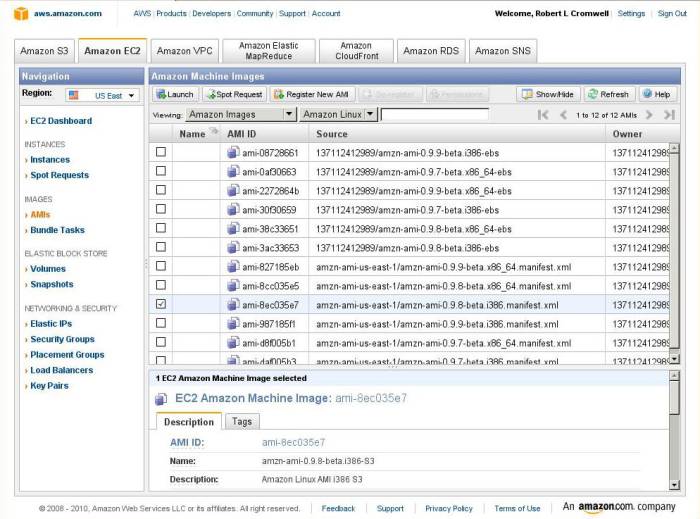
Start by creating a fresh EC2 instance. Sign in to Amazon AWS and click on AMIs to go to the AWS Management Console for selecting Amazon Machine Images.
Not all Linux instances will support what we need to do. I had this fail on some Fedora based images, and then easily got it to work on the Amazon Linux images.
Here you can see that I have selected the Amazon Linux images from the pull-down menus: "Amazon Images" in the first pull-down menu, and specifically "Amazon Linux" in the second.
I have selected a rather light-weight one of those. We will only use the running instance for a short while. It just needs a recent enough kernel to provide the needed file system cryptography. Do make a note of the Availability Zone in which it is located. I arbitrarily picked the US-East region, and I will pick the US-East-1A Availability Zone.
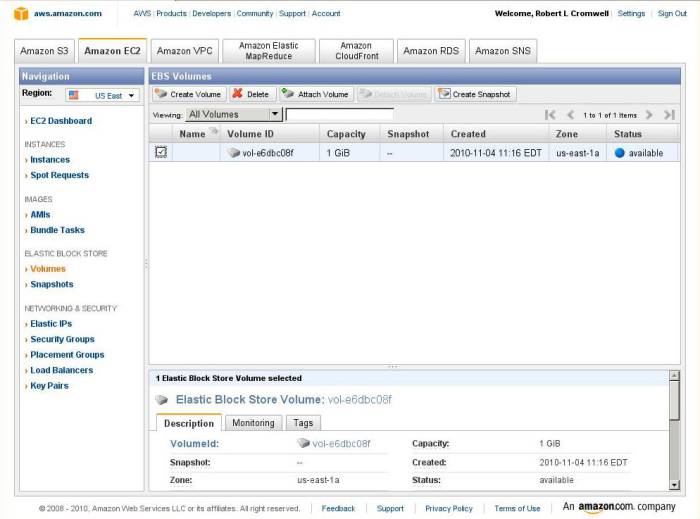
Once your new EC2 instance is coming up, click on the Go To EBS Volumes link to create an Elastic Block Store volume, or click on Volumes in the AWS Management Console. I just picked 1 GB, the smallest, for this demo. Make sure that you put it in the same Availability Zone as your running EC2 instance!
EBS volumes do not become available immediately. This is because Amazon first replicates the new storage device (or the image thereof) across multiple devices within that one data center. Once it is truly available, you see it in the dashboard. This won't take a long time, but there will be a noticeable delay of a few seconds.
I have selected it and am about to click "Attach Volume" to attach it to my running volume.
You will be asked to specify a device name,
and your choices in the pull-down menu are
/dev/sdf and so on.
However....
Amazon Web Services are based on
Xen virtualization.
Remember that Amazon staff aren't really connecting
a new blank 1 GB disk for you!
The Amazon software is creating a new virtual disk image.
The kernels of the Amazon Linux instances will
probably recognize the newly attached device as a
Xen Virtual Disk device,
and the kernel will create the device node as
/dev/xvdf and so on.
That's block device at major number 202,
minor number 80 and continuing by multiples of 16,
if you care about that level of detail.
This e-mail discussion at AWS
addresses the device name variability.
It's time to connect to your EC2 instance and set up
secure storage.
In the
Instances
view of the dashboard,
find your hostname in the bottom pane.
Notice that a hostname like this:
ec2-11-22-33-44.compute-1.amazonaws.com
implies an IP address of:
11.22.33.44
The Amazon Linux instances are set up so that
root
login is not allowed.
You must instead use the ec2-user account.
It will be set up for authentication using the key pair
your specified when deploying that instance.
So, let's connect! You can see that I'm assuming that you have your AWS private key stored in a reasonable place. Notice that the permissions of that directory must be 700, and of that file, 600 or 400. Otherwise, SSH will very reasonably refuse to run, but it may do so in a mysterious fashion that leaves you wondering why it didn't work. Here we go:
% ssh -i ~/.ssh/aws.pem ec2-user@ec2-11-22-33-44.compute-1.amazonaws.com
You get the usual warning that the host's RSA key fingerprint
is some random looking hexadecimal value.
Since you're pretty sure of what's going on and you have no
way of knowing what the host key fingerprint was supposed
to be in the first place, answer "Yes" so it works.
You will then get a warning that this machine's key,
hostname, and IP address have been added to your list
of known hosts, stored in ~/.ssh/known_hosts.
You may want to clean that up when you're done with this.
Here comes the ASCII art /etc/motd followed by a
command prompt.
Notice the different hostname and IP address indicated in
the command prompt.
The EC2 instances are behind a
network address translating
firewall, or
NAT.
 __|  __|_  )  Amazon Linux AMI
 _|  (     /     Beta
___|\___|___|

See /etc/image-release-notes for latest release notes. :-)
[ec2-user@ip-10-196-129-139 ~]$
Now you are connected, but as the unprivileged user
ec2-user.
You could tediously do all of the following by typing
sudo before every command, but the Amazon Linux
machine is set up like Ubuntu and so we can become
root despite not knowing the password.
Let's become root in a way (with that bare dash
option to su) that sets up the environment properly:
[ec2-user@ip-10-196-129-139 ~]$ sudo su -
[root@ip-10-196-129-139 ~]#
OK, that's more like it. Now let's investigate the devices and mounted file systems.
[root@ip-10-196-129-139 ~]# ls -l /dev/sd*
ls: /dev/sd*: No such file or directory
[root@ip-10-196-129-139 ~]# ls -l /dev/xvd*
brw-rw---- 1 root disk 202,  1 Nov  4 15:17 /dev/xvda1
brw-rw---- 1 root disk 202,  2 Nov  4 15:17 /dev/xvda2
brw-rw---- 1 root disk 202,  3 Nov  4 15:17 /dev/xvda3
brw-rw---- 1 root disk 202, 80 Nov  4 15:23 /dev/xvdf
[root@ip-10-196-129-139 ~]# df -h
Filesystem            Size  Used Avail Use% Mounted on
/dev/xvda1            9.9G  846M  9.0G   9% /
tmpfs                 839M     0  839M   0% /dev/shm
/dev/xvda2            147G  188M  140G   1% /media/ephemeral0
[root@ip-10-196-129-139 ~]# swapon -s
Filename                                Type            Size    Used    Priority
/dev/xvda3                              partition       8393924 722612  -1
As expected, the storage devices are Xen Virtual Disk devices.
If you see sdf instead of xvdf,
then modify the following commands as needed.
If you're truly curious, you could verify that the new disk device really is empty:
[root@ip-10-196-129-139 ~]# hexdump -C /dev/xvdf
00000000  00 00 00 00 00 00 00 00  00 00 00 00 00 00 00 00 |................|
*
40000000
Before going any further, we need to make sure that the
kernel has the required cryptographic file system support.
We need support for the CONFIG_CRYPTO_AES module,
probably compiled as a module (shown as m)
rather than built into the monolithic kernel
(shown as y).
Let's see what our kernel release is, and then check for
the presence of some of the cryptographic features.
Here's what I see on the example machine I'm using here:
[root@ip-10-196-129-139 ~]# uname -r 2.6.34.7-56.40.amzn1.i686 [root@ip-10-196-129-139 ~]# egrep 'AES|CRYPTO' /boot/config-* CONFIG_BLK_DEV_CRYPTOLOOP=m CONFIG_CRYPTO=y CONFIG_CRYPTO_FIPS=y CONFIG_CRYPTO_ALGAPI=y CONFIG_CRYPTO_ALGAPI2=y CONFIG_CRYPTO_AEAD=m CONFIG_CRYPTO_AEAD2=y CONFIG_CRYPTO_BLKCIPHER=m CONFIG_CRYPTO_BLKCIPHER2=y CONFIG_CRYPTO_HASH=y CONFIG_CRYPTO_HASH2=y CONFIG_CRYPTO_RNG=m CONFIG_CRYPTO_RNG2=y CONFIG_CRYPTO_PCOMP=y CONFIG_CRYPTO_MANAGER=y CONFIG_CRYPTO_MANAGER2=y CONFIG_CRYPTO_GF128MUL=m CONFIG_CRYPTO_NULL=m # CONFIG_CRYPTO_PCRYPT is not set CONFIG_CRYPTO_WORKQUEUE=y CONFIG_CRYPTO_CRYPTD=m CONFIG_CRYPTO_AUTHENC=m CONFIG_CRYPTO_TEST=m CONFIG_CRYPTO_CCM=m CONFIG_CRYPTO_GCM=m CONFIG_CRYPTO_SEQIV=m CONFIG_CRYPTO_CBC=m CONFIG_CRYPTO_CTR=m CONFIG_CRYPTO_CTS=m CONFIG_CRYPTO_ECB=m CONFIG_CRYPTO_LRW=m CONFIG_CRYPTO_PCBC=m CONFIG_CRYPTO_XTS=m CONFIG_CRYPTO_HMAC=y CONFIG_CRYPTO_XCBC=m CONFIG_CRYPTO_VMAC=m CONFIG_CRYPTO_CRC32C=y CONFIG_CRYPTO_CRC32C_INTEL=m CONFIG_CRYPTO_GHASH=m CONFIG_CRYPTO_MD4=m CONFIG_CRYPTO_MD5=y CONFIG_CRYPTO_MICHAEL_MIC=m CONFIG_CRYPTO_RMD128=m CONFIG_CRYPTO_RMD160=m CONFIG_CRYPTO_RMD256=m CONFIG_CRYPTO_RMD320=m CONFIG_CRYPTO_SHA1=y CONFIG_CRYPTO_SHA256=m CONFIG_CRYPTO_SHA512=m CONFIG_CRYPTO_TGR192=m CONFIG_CRYPTO_WP512=mCONFIG_CRYPTO_AES=mCONFIG_CRYPTO_AES_586=mCONFIG_CRYPTO_ANUBIS=m CONFIG_CRYPTO_ARC4=m CONFIG_CRYPTO_BLOWFISH=m CONFIG_CRYPTO_CAMELLIA=m CONFIG_CRYPTO_CAST5=m CONFIG_CRYPTO_CAST6=m CONFIG_CRYPTO_DES=m CONFIG_CRYPTO_FCRYPT=m CONFIG_CRYPTO_KHAZAD=m # CONFIG_CRYPTO_SALSA20 is not set CONFIG_CRYPTO_SALSA20_586=m CONFIG_CRYPTO_SEED=m CONFIG_CRYPTO_SERPENT=m CONFIG_CRYPTO_TEA=m CONFIG_CRYPTO_TWOFISH=m CONFIG_CRYPTO_TWOFISH_COMMON=m CONFIG_CRYPTO_TWOFISH_586=m CONFIG_CRYPTO_DEFLATE=m CONFIG_CRYPTO_ZLIB=m CONFIG_CRYPTO_LZO=m CONFIG_CRYPTO_ANSI_CPRNG=m # CONFIG_CRYPTO_HW is not set
Well, that's support for just about everything! The only cryptographic kernel modules not included with this OS are those for pcrypt (a parallel crypto wrapper), salsa20 (a candidate stream cipher algorithm), and dedicated cryptographic processors (not really relevant on a virtualized platform). The two important ones for our purposes are highlighted above.
This example had you looking at the kernel configuration file.
It is possible that the stored is not exactly what was used
to build the kernel.
If the kernel was built to contain its own configuration,
you could look in the file /proc/config.gz,
which is actually a kernel data structure containing
a gzip'ed version of the kernel's build configuration.
If that file doesn't exist, maybe support was built
as a module only.
[root@ip-10-196-129-139 ~]# zcat /proc/config.gz | egrep 'AES|CRYPTO'
/proc/config.gz: No such file or directory
[root@ip-10-196-129-139 ~]# modprobe ikconfig
[root@ip-10-196-129-139 ~]# zcat /proc/config.gz | egrep 'AES|CRYPTO'
CONFIG_BLK_DEV_CRYPTOLOOP=m
CONFIG_CRYPTO=y
CONFIG_CRYPTO_FIPS=y
CONFIG_CRYPTO_ALGAPI=y
CONFIG_CRYPTO_ALGAPI2=y
[... much output deleted ...]
For even better information, browse through
/proc/crypto to see further details.
[root@ip-10-196-129-139 ~]# more /proc/crypto
[... much output deleted ...]

name         : cbc(aes)
driver       : cbc(aes-generic)
module       : cbc
priority     : 100
refcnt       : 1
selftest     : passed
type         : blkcipher
blocksize    : 16
min keysize  : 16
max keysize  : 32
ivsize       : 16
geniv        : <default>

[... much more output deleted ...]
It appears that this platform has what we need. Let's set up encrypted storage.
Setting Up Encrypted Storage
Usually, you create a file system in a block storage device (like a disk partition), mount that by connecting it into your directory hierarchy, and start storing files. Keeping our file system encrypted requires a few more steps:
- Set up the block device so that it contains an encrypted image.
- "Open" (or connect) that encrypted image. This makes it appear through the device mapper, a kernel module that can make one device appear as another (as used with logical volumes), or make a file appear to be a device.
- Create a file system in the "device" presented by the device mapper.
- Mount and use that file system
So, lets start by setting up encryption on
the attached storage volume.
The -y option to the following command
requires us to type the pass phrase twice.
This is a good thing because mistyping it on a single
instance leaves the device unusable.
If you are deeply paranoid about NSA backdoors, you could use Blowfish instead of AES:
# cryptsetup -y --cipher blowfish luksFormat /dev/xvdf
However, see the following discussion of the low entropy of English passphrases. Your most likely catastrophic failure will be a corruption of the LUKS header and complete loss of the stored ciphertext. Next most likely will be your choice of a guessable passphrase. NSA backdoors are a far less appropriate thing to worry about.
While we could specify the cipher on the command line, we don't. The default is probably the most appropriate: 256-bit AES in Cipher Block Chaining mode with ESSIV. See the discussion here for why AES-CBC/ESSIV is the preferred cipher and mode. This will take what is entered as a pass phrase and hash it thousands of times with a randomly selected salt value to generate a key far stronger against cryptanalytic attack than the pass phrase itself.
Amazon
ASIN: 0471117099
You would not want to use your pass phrase as the actual key. English text contains only about 1.1 bits of entropy per character. Entropy is randomness or unpredictableness. To take advantage of a 256-bit key space, you need a full 256 bits of entropy in the key. Face it, there is no way you are typing a pass phrase of 240 or more characters! I'll urge you to use a challenging pass phrase, but I'm a realist about just how large and complex it will really be.
[root@ip-10-196-129-139 ~]# cryptsetup -y luksFormat /dev/xvdf WARNING! ======== This will overwrite data on /dev/xvdf irrevocably. Are you sure? (Type uppercase yes): YES Enter LUKS passphrase:**************Verify passphrase:**************[root@ip-10-196-129-139 ~]#
Let's verify what happened.
First, we'll check on the device and what it holds.
Then, we'll ask for details of the encrypted file.
The first file command just reports on the block
device, the second with the -s option reads and
reports on the header of what is found there.
I have inserted blank lines between commands
and wrapped an extra long line of output,
in the interest of readability:
[root@ip-10-196-129-139 ~]# file /dev/xvdf
/dev/xvdf: block special

[root@ip-10-196-129-139 ~]# file -s /dev/xvdf
/dev/xvdf: LUKS encrypted file, ver 1 [aes, cbc-essiv:sha256, sha1] \
				UUID: f05a0cf0-3d67-48fd-92c9-fb44e81

[root@ip-10-196-129-139 ~]# cryptsetup luksDump /dev/xvdf
LUKS header information for /dev/xvdf

Version:        1
Cipher name:    aes
Cipher mode:    cbc-essiv:sha256
Hash spec:      sha1
Payload offset: 2056
MK bits:        256
MK digest:      1a 33 cb 7b db d3 cd 7d 02 22 6f 56 04 83 21 37 be ab 80 a1
MK salt:        5a d7 05 62 60 28 14 f8 db 30 f1 32 3b 95 58 26
                ef 11 ae ec 41 92 04 13 80 25 e7 c9 9e 0c bc 91
MK iterations:  30000
UUID:           baf3157b-1f0d-4db4-af91-93fe052aa873

Key Slot 0: ENABLED
	Iterations:             120225
	Salt:                   80 8f dd 99 2d 97 03 73 8f 8f aa 46 f5 fb dc 08
				0a 1b a1 3c 86 c9 42 b9 0c 75 d1 67 34 02 3b 83
	Key material offset:    8
	AF stripes:		4000
Key Slot 1: DISABLED
Key Slot 2: DISABLED
Key Slot 3: DISABLED
Key Slot 4: DISABLED
Key Slot 5: DISABLED
Key Slot 6: DISABLED
Key Slot 7: DISABLED
The raw encrypted storage is there. Now we need to make it useful as a device through the magic of the device mapper.
Obviously (I hope!), the name storedev in
the following commands is something you are free to choose.
Just don't give yourself any extra grief by using characters
meaningful to shells, like white space or most of the
punctuation marks other than these:
- = + . , @ %
[root@ip-10-196-129-139 ~]# cryptsetup luksOpen /dev/xvdf storedev
Enter passphrase for /dev/xvdf:
Key slot 0 unlocked.
[root@ip-10-196-129-139 ~]# ls -l /dev/mapper/
total 0
crw-rw---- 1 root root 10, 59 Nov  4 15:17 control
lrwxrwxrwx 1 root root      7 Nov  4 15:41 storedev -> ../dm-0
From here on, it's much like any sort of file system
work on Linux!
We just need to use the name provided by the
device mapper, either:
/dev/mapper/storedev
or:
/dev/dm-0
Let's be modern, and use the Btrfs file system.
We will create the file system in the crypto device,
create a mount point, and mount the new file system.
Then we'll make it owned by ec2-user so we
can copy data into place.
[root@ip-10-196-129-139 ~]# mkfs.btrfs /dev/mapper/storedev
<...narrative output here...>

[root@ip-10-196-129-139 ~]# mkdir /secure

[root@ip-10-196-129-139 ~]# mount /dev/mapper/storedev /secure

[root@ip-10-196-129-139 ~]# chown ec2-user /secure

[root@ip-10-196-129-139 ~]# df -hT
Filesystem            Type      Size  Used Avail Use% Mounted on
/dev/xvda1            xfs       9.9G  846M  9.0G   9% /
tmpfs                 devtmpfs  839M     0  839M   0% /dev/shm
/dev/xvda2            xfs       147G  188M  140G   1% /media/ephemeral0
/dev/mapper/storedev  btrfs    1007M   18M  990M   2% /secure
Back Up Your LUKS Header!
Media Lifetime and Data ResilienceDisks fail. Common models of disk drives have about a 5% chance of failing and losing all their data in a year. Be careful at work and home. However...
Major cloud providers aggressively replace storage devices.
Plus, your storage devices are really virtualized disks
on top of RAID.
Disk failure is not a concern at AWS or Google Cloud.
Worry about your errors when logged in as
root.
What we're doing here increases our risk in a way. Many actions that seem quite reasonable can overwrite some data in the LUKS header and render the stored data permanently inaccessible.
Backup the LUKS header as shown here.
Then store backupfile somewhere safe,
clearly labeled.
# cryptsetup luksHeaderBackup --header-backup-file /path/to/backupfile /dev/xvdf
You can test a device to see if it has a valid LUKS header:
# cryptsetup -v isLuks /dev/xvdf
# blkid -p /dev/xvdf
If you need to restore the LUKS header, it's easy:
# cryptsetup luksHeaderRestore --header-backup-file /path/to/backupfile /dev/xvdf
Now, as for backing up the encrypted data contained in that file system, you need to make a choice.
If you use tar or pax or similar
to back up the file system,
you are going through the kernel's dm-crypt module
and making another copy of that sensitive data.
You could use gpg or openssl
or other utilities to encrypt the resulting archive.
An alternative would be to make an image backup of the
volume itself.
Simply use dd to copy that storage device
onto backup media.
Of course, the resulting image will be quite large.
And given the high entropy of ciphertext,
it will not compress any.
However you decide to do it, make backups and then verify that you can restore from them.
And Now It's Ready For Secure Storage!
That's all there is to it! Copy your data into place. For example, from back on your machine at home or work:
% scp -pr ~/private-stuff ec2-user@ec2-11-22-33-44.compute-1.amazonaws.com/secure/
Once you have your data in place, you need to unmount the file system and tell the kernel to close the encrypted device, a step that flushes the key from the kernel.
[root@ip-10-196-129-139 /]# umount /secure
[root@ip-10-196-129-139 /]# cryptsetup luksClose storedev
Now would be the time to go to the Instances view and terminate your running instance. You've racked up a bill of US $0.06 for the running instance, unless you have been typing so slowly that it took you two hours and you owe a whopping $0.12.
But before you disconnect, if you are really curious, you could see what's in that encrypted storage device. The first 4,096 bytes (hex 0x1000) do indicate what you have done: used the Linux dm-crypt module with LUKS to create an AES CBC-ESSIV encrypted file system. This is the type of investigation that might be interesting once, just to verify how it works, but I can't see any point in routinely examining a gigabyte or more of pseudorandom ciphertext:
[root@ip-10-196-129-139 /]# hexdump -C /dev/xvdf | less
00000000  4c 55 4b 53 ba be 00 01  61 65 73 00 00 00 00 00  |LUKS....aes.....|
00000010  00 00 00 00 00 00 00 00  00 00 00 00 00 00 00 00  |................|
00000020  00 00 00 00 00 00 00 00  63 62 63 2d 65 73 73 69  |........cbc-essi|
00000030  76 3a 73 68 61 32 35 36  00 00 00 00 00 00 00 00  |v:sha256........|
00000040  00 00 00 00 00 00 00 00  73 68 61 31 00 00 00 00  |........sha1....|
00000050  00 00 00 00 00 00 00 00  00 00 00 00 00 00 00 00  |................|
00000060  00 00 00 00 00 00 00 00  00 00 08 08 00 00 00 20  |............... |
00000070  1a 33 cb 7b db d3 cd 7d  02 22 6f 56 04 83 21 37  |.3.{...}."oV..!7|
00000080  be ab 80 a1 5a d7 05 62  60 28 14 f8 db 30 f1 32  |....Z..b`(...0.2|
00000090  3b 95 58 26 ef 11 ae ec  41 92 04 13 80 25 e7 c9  |;.X&....A....%..|
000000a0  9e 0c bc 91 00 00 75 30  62 61 66 33 31 35 37 62  |......u0baf3157b|
000000b0  2d 31 66 30 64 2d 34 64  62 34 2d 61 66 39 31 2d  |-1f0d-4db4-af91-|
000000c0  39 33 66 65 30 35 32 61  61 38 37 33 00 00 00 00  |93fe052aa873....|
000000d0  00 ac 71 f3 00 01 d5 a1  80 8f dd 99 2d 97 03 73  |..q.........-..s|
000000e0  8f 8f aa 46 f5 fb dc 08  0a 1b a1 3c 86 c9 42 b9  |...F.......<..B.|
000000f0  0c 75 d1 67 34 02 3b 83  00 00 00 08 00 00 0f a0  |.u.g4.;.........|
00000100  00 00 de ad 00 00 00 00  00 00 00 00 00 00 00 00  |................|
00000110  00 00 00 00 00 00 00 00  00 00 00 00 00 00 00 00  |................|
00000120  00 00 00 00 00 00 00 00  00 00 01 08 00 00 0f a0  |................|
00000130  00 00 de ad 00 00 00 00  00 00 00 00 00 00 00 00  |................|
00000140  00 00 00 00 00 00 00 00  00 00 00 00 00 00 00 00  |................|
00000150  00 00 00 00 00 00 00 00  00 00 02 08 00 00 0f a0  |................|
00000160  00 00 de ad 00 00 00 00  00 00 00 00 00 00 00 00  |................|
00000170  00 00 00 00 00 00 00 00  00 00 00 00 00 00 00 00  |................|
00000180  00 00 00 00 00 00 00 00  00 00 03 08 00 00 0f a0  |................|
00000190  00 00 de ad 00 00 00 00  00 00 00 00 00 00 00 00  |................|
000001a0  00 00 00 00 00 00 00 00  00 00 00 00 00 00 00 00  |................|
000001b0  00 00 00 00 00 00 00 00  00 00 04 08 00 00 0f a0  |................|
000001c0  00 00 de ad 00 00 00 00  00 00 00 00 00 00 00 00  |................|
000001d0  00 00 00 00 00 00 00 00  00 00 00 00 00 00 00 00  |................|
000001e0  00 00 00 00 00 00 00 00  00 00 05 08 00 00 0f a0  |................|
000001f0  00 00 de ad 00 00 00 00  00 00 00 00 00 00 00 00  |................|
00000200  00 00 00 00 00 00 00 00  00 00 00 00 00 00 00 00  |................|
00000210  00 00 00 00 00 00 00 00  00 00 06 08 00 00 0f a0  |................|
00000220  00 00 de ad 00 00 00 00  00 00 00 00 00 00 00 00  |................|
00000230  00 00 00 00 00 00 00 00  00 00 00 00 00 00 00 00  |................|
00000240  00 00 00 00 00 00 00 00  00 00 07 08 00 00 0f a0  |................|
00000250  00 00 00 00 00 00 00 00  00 00 00 00 00 00 00 00  |................|
*
00001000  ff c7 c0 76 72 6d 47 2f  57 72 df 3d f3 c4 c7 0c  |...vrmG/Wr.=....|
00001010  96 85 71 24 f7 0e b0 be  4c b3 a0 c6 85 b3 fe 45  |..q$....L......E|
00001020  af 10 8b 20 07 db f0 8f  e0 99 40 fb 5b a0 90 fa  |... ......@.[...|
00001030  4e 82 fe ba 98 55 d4 4f  6f be 93 24 e0 6c b5 52  |N....U.Oo..$.l.R|
00001040  3f b0 a3 01 21 68 2a 49  65 b0 dd 8a 10 e8 aa 85  |?...!h*Ie.......|
00001050  6a 27 46 5d 0f f6 a2 f5  91 c5 28 07 cc 2c be 8a  |j'F]......(..,..|
00001060  c4 79 15 3f 01 a7 c8 5e  d3 1e d8 ef ed 27 5b 5c  |.y.?...^.....'[\|
00001070  fb eb 96 95 ed 6d 39 8f  c3 82 b3 7e 0b 6a 44 9c  |.....m9....~.jD.|
00001080  4e ae 57 65 7b 49 c3 32  e5 06 7e 47 f0 9b 87 71  |N.We{I.2..~G...q|
00001090  ab dd 48 27 d5 af cd e7  32 f0 cd 90 d9 ae 51 94  |..H'....2.....Q.|
000010a0  04 37 6a 70 da 41 bf f0  8d 36 e2 3f 52 fe 77 fe  |.7jp.A...6.?R.w.|
000010b0  21 e8 e8 5c fc c2 69 6e  ae 6a 27 3e f6 8d 54 4e  |!..\..in.j'>..TN|
000010c0  66 06 90 ee 94 26 4a c6  3a 9e b0 60 50 f4 21 43  |f....&J.:..`P.!C|
000010d0  53 f1 73 0a 4a 19 9f b9  8e 3d 63 85 97 a7 6e 51  |S.s.J....=c...nQ|
000010e0  de 27 5c ce 3e e2 dc 34  1e c4 8c 98 4d fa 34 fb  |.'\.>..4....M.4.|
000010f0  25 dd 1f 0d e9 53 44 58  84 10 ef 53 64 6d 39 68  |%....SDX...Sdm9h|
00001100  ec 43 68 f4 b3 6a b5 d2  a9 95 52 19 db 68 ca a5  |.Ch..j....R..h..|
00001110  ed a9 d7 6a 4d 7d aa 54  84 5a 26 18 80 9a ec d0  |...jM}.T.Z&.....|
00001120  8a 4e 06 5a dc 45 8e 23  9c 3b 5f 66 31 ca 9d 79  |.N.Z.E.#.;_f1..y|
00001130  7c 93 ed b9 1b a3 63 3a  ec ae 19 68 fc c5 1e 55  ||.....c:...h...U|
00001140  b9 cb 9f fa fb 1b 7f 8c  14 9e f1 9d 90 77 e8 02  |.............w..|
00001150  7f 8c d7 4f b5 5f f1 95  a7 bf d3 4c e5 16 f9 d1  |...O._.....L....|
00001160  f7 82 e8 ab be 0a a7 6a  14 a9 56 56 fe d3 1c d5  |.......j..VV....|
00001170  3d 0c 63 0e d7 24 c4 95  05 41 54 7a 95 43 05 a4  |=.c..$...ATz.C..|
00001180  f1 41 bd 72 41 c9 d8 2a  aa aa 87 c7 9b 36 c9 86  |.A.rA..*.....6..|
00001190  30 46 a9 6f d9 91 e3 8c  9b b4 48 91 db 2a 4b b9  |0F.o......H..*K.|
000011a0  62 f7 a7 18 64 4e e4 55  cc 07 9e 34 43 01 97 90  |b...dN.U...4C...|
000011b0  be 91 ac aa f5 41 a7 2c  b9 4a 0e 9c 7d cf b0 22  |.....A.,.J..}.."|
000011c0  3b 8d 72 b6 49 77 97 15  c3 b3 26 59 2f 59 a6 23  |;.r.Iw....&Y/Y.#|
000011d0  14 42 99 10 32 39 1f 46  a8 26 11 a2 e8 7e 89 f9  |.B..29.F.&...~..|
^C
Just for the sake of completeness, here is the set of loaded kernel modules at the end of a session with an encrypted storage volume. I have highlighted those involved in the cryptography, the device mapping, and the Btrfs file system:
[root@ip-10-196-129-139 /]# lsmod
Module                  Size  Used by
btrfs                 274696  0
jbd2                   71364  1 btrfs
crc16                   1243  1 btrfs
sha256_generic         14258  0
aes_i586                7102  0
aes_generic            27440  1 aes_i586
cbc                     2037  0
dm_crypt                9780  0
ipv6                  220483  10
binfmt_misc             5473  1
dm_mirror              10634  0
rtc_core               11168  0
rtc_lib                 1817  1 rtc_core
usbcore               109667  0
nls_base                5674  1 usbcore
dm_region_hash          7635  1 dm_mirror
dm_log                  7429  2 dm_mirror,dm_region_hash
ext3                  103012  2
jbd                    45817  1 btrfs,xfs
mbcache                 4982  2 btrfs
linear                  3379  0
dm_mod                 52624  3 dm_crypt,dm_mirror,dm_log
xen_blkfront            7245  3
xen_netfront           12568  0
Resizing The Encrypted EBS Storage
This should be as simple as first expanding the EBS volume as usual, then expanding the encrypted device, and then expanding the file system:
- Unmount the EBS device.
- Create a snapshot.
- Create a new, larger, EBS, specifying it is based on that snapshot.
- Attach the new EBS.
-
Resize the encrypted device:
cryptsetup --verbose resize name-goes-here -
Resize the file system on that device:
btrfs filesystem resize max /dev/mapper/name-goes-here -
Just to be careful:
btrfs check -p /dev/mapper/name-goes-here - Mount it and use it!