
Installing CentOS Linux on an Alpha DS10, Personal Workstation 500au ("Miata"), or AlphaStation 200
Linux on Alphas
The following shows how to install CentOS Linux on an Alpha DS10, an Alpha Personal Workstation 500au ("Miata"), and an Alphastation 200. With a little thought and experimentation it should also work with other distributions and other Alphas.
The Rise andFall of DEC
Red Hat seems to have given up on the Alpha platform. Well, that's not much of a change, they never did very much with it in the first place...
CentOS provides free distributions that boot and run just fine on the Alphas, using software packages identical to those found in the expensive Red Hat Enterprise Linux distributions!
OpenBSD also runs just fine on Alphas, providing a choice of a completely different UNIX OS. This page should help to illustrate the OpenBSD instructions for installation on Alphas.
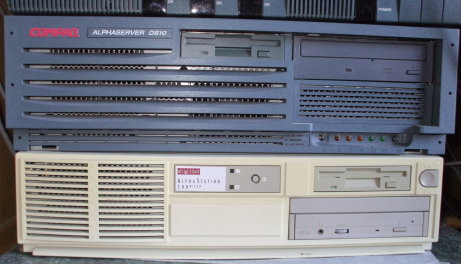
AlphaServer DS10 and AlphaStation 200 4/233
DEC Alpha Hardware Platforms
| Platform | CPU | Memory | Disks |
| DS10 | EV6, 466 MHz | 256 MB | 5290 MB 10 GB |
| Miata | EV56, 500 MHz | 128 MB | 4290 MB |
| Alphastation 200 4/233 | EV45, 233 MHz | 64 MB | 2104 MB |
Step 1 — Get CentOS Linux for Alphas
Get it from http://www.centos.org/ and burn CDs from the ISO images you find on the download page.
Step 2 — Switch to the SRM Console
Maybe you won't need this, maybe your system will boot to a white-on-blue "triple-chevron" prompt:
ea.e9.e8.e7.e6.e5.e4
  Digital Personal WorkStation 500au Console V7.0-10
        built on Mar 18 1999 at 10:17:58
>>>
But if not:
1: Reboot, you will be looking at the AlphaBIOS environment.
2: Press F2 during the startup (or Ctrl-B if you are using a serial console).
3: Choose CMOS Setup from the menu.
4: Select Advanced CMOS Setup with F6 (or Ctrl-F if you are using a serial console).
5: Change Console Selection to OpenVMS Console (SRM).
6: Confirm and save your changes with F10 (or Ctrl-U if you are using a serial console).
7: Power-cycle the system, it should boot into the SRM.
Step 3 — Inventory your system from the SRM interface
I see this on a DS10:
>>>show device
dka0.0.0.15.0      DKA0             RZ1CF-BF  1614
dqa0.0.1.13.0      DQA0      COMPAQ CDR-8435  0013
dqb0.0.1.13.0      DQB0     IBM-DTTA -351010  T5CCA76B
dva0.0.0.0.0       DVA0
ewa0.0.0.9.0       EWA0   08-00-2B-86-26-5B
ewb0.0.0.9.0       EWB0   08-00-2B-86-26-96
pka0.7.0.15.0      PKA0      SCSI Bus ID 7  5.57
and this on a Miata:
>>>show device
dkb100.1.0.207.0   DKB100   TOSHIBA CD-ROM XM-6302B  1017
dkc0.0.0.1004.0    DKC0                    RZ2CC-KA  5520
dva0.0.0.0.1       DVA0
ewa0.0.0.3.0       EWA0           00-00-F8-76-6E-C9
ewb0.0.0.1008.0    EWB0           08-00-2B-C3-F1-30
pkc0.7.0.1004.0    PKC0               SCSI Bus ID 7  5.57
pkd0.7.0.1009.0    PKD0               SCSI Bus ID 7  5.57
pqa0.0.0.107.0     PQA0                    PCI EIDE
pqb0.0.0.207.0     PQA0                    PCI EIDE
And this on an impressively underpowered Alphastation 200 4/233:
>>>show device
dka0.0.0.6.0       DKA0             RZ28M  0003
dka400.4.0.6.0     DQB0             RRD43  1004
dva0.0.0.0.0       DVA0
ewa0.0.0.11.0      EWA0   08-00-2B-5E-0D-57
pka0.7.0.6.0       PKA0      SCSI Bus ID 7
>>>show memory
     64 Meg of System Memory
     Bank 0 = No Memory Detected
     Bank 1 = No Memory Detected
     Bank 2 = 64 Mbytes(32 MB Per Simm) Starting at 0x0
Just 64 MB RAM, oof! This means:
| Device | DS10 | Miata | Alphastation 200 | |||
| SRM Name | Linux Name | SRM Name | Linux Name | SRM Name | Linux Name | |
| SCSI Disk | DKC0 |
/dev/sda |
DKA0 |
/dev/sda |
||
| EIDE/ATAPI Disk | DKA0 |
/dev/hda |
||||
| EIDE/ATAPI CD-ROM | DQA0 |
/dev/hdc |
DKB100 |
/dev/hdb |
DKA400 |
/dev/hdc |
| Floppy drive | DVA0 |
/dev/fd0 |
DVA0 |
/dev/fd0 |
DVA0 |
/dev/fd0 |
| First Ethernet interface | EWA0 |
eth0 |
EWA0 |
eth0 |
EWA0 |
eth0 |
| Second Ethernet interface | EWB0 |
eth1 |
EWB0 |
eth1 |
||
How do you know whether DKA0 is a SCSI or EIDE disk?
I have no idea, other than than opening the case and seeing where the cables go. HP/Compaq/DEC hardware engineers would recognize RZ1CF-BF as an EIDE device and RZ28M as SCSI.
Step 4 — Set up SRM variables
You should see this, with dka0 changed
as appropriate — this is on the DS10:
>>>show b*
boot_dev       dka0.0.0.15.0
boot_file
boot_osflags   0
boot_reset     OFF
bootdef_dev    dka0.0.0.15.0
booted_dev
booted_file
booted_osflags
Make changes with commands something like this:
>>>set boot_dev dka0
>>>set boot_file ""
What it means — you only specify the boot device
and the flag "0".
The aboot boot loader is stored in the first
few megabytes on that disk, and it can read Linux
file systems.
It looks for /etc/aboot.conf and reads the
line tagged as entry 0, where it reads the
details about the kernel file, the initrd file,
what to mount as the root file system, etc.
Step 5 — Boot from the CentOS CD
Change your SRM boot device name and Linux CD-ROM name as needed. Using what I saw above:
>>>boot dqa0
You can specify everything if you have to:
>>>boot dqa0 -file /kernels/vmlinux.gz -flags "initrd=/images/initrd.gz"
Step 6 — Install CentOS
This should be pretty straightforward!
Unfortunately, Red Hat's "Disk Druid" program for setting up the disk partitions and file systems is horribly flawed. It does not let you specify the actual partition layout. That leads it to chide you that you (really it!) have a bad starting position for the first partition. But it does not let you fix it.
My solution: get far enough into the installation
that <Ctrl><Alt><F2>
gives you a shell.
Drop to the shell and set up the partitions by hand:
# fdisk /dev/sda
Make sure you leave about 5 MB unused
at the start of the disk.
That space is needed for the disklabel
and the bootloader.
For the PC crowd, the disklabel is what IBM called
the "partition table".
Note that
fdisk
is not the usual IBM partition table tool
you may know from Intel/AMD-based Linux!
It seems to me to be just like the BSD version, see its
manual page.
Then reboot the system (power cycle works fine here) and start over. The partitions are now set up correctly. Use the lame Disk Druid just to specify the mount points for those existing partitions.
Step 7 — Boot from the hard drive
The reboot at the end of the install will fail,
since you removed the CD and the SRM will try
to literally re-boot in the same way.
Stop its attempts to boot from the missing CD
with Ctrl-C and then:
>>>boot
Step 8 — Install software updates
It is very likely that vulnerabilities have been discovered in the software on the CDs you used.
Please update your software and
patch known holes:
# yum check-update
# yum upgrade
Step 9 — Enjoy!
In case of trouble — Install fails to start
With 128 MB on the Miata, the anaconda
thought that it had enough memory to run the
installation in graphical mode.
But it didn't...
To work around this, boot asking for a text install:
>>>boot dkb100 -flags "0 text"
In case of trouble — Missing bootloader
I found
this Gentoo page
helpful for explaining how to set up
the boot loader with swriteboot and abootconf.
However, the only time this has mattered to me is when I
did not get the partition table set up correctly.
For me, that has been every time I tried to use Disk Druid
to do it...
It's time to reinstall.
Go back up and read the section above describing how
you must use fdisk to manually set up
the disk before doing the installation.
Leave the first 5 MB free and then create slices
A, B, C, ...
When you got back into the installation, just use
Disk Druid to assign file systems and the swap area
to those existing slices.
In case of trouble — SELinux hang with only 64 MB RAM
I have found that the booting process hangs for ages around the time it is initializing SELinux. I should have asked for "Disabled" instead of "Warn" during the install on that Alphastation....
- Press the reset button...
-
Boot with an extra parameter:
>>>boot -flags "0 selinux=0"
Be patient. That isn't going to go terribly fast with just 64 MB of RAM, but it should get there eventually. -
Change the contents of
/etc/aboot.confby addingselinux=0to each defined boot target. Change the lines from something like this:
0:2/boot/vmlinuz-2.6.9-EC initrd=/boot/initrd-2.6.9-EC.img root=/dev/sda2
to something like this:
0:2/boot/vmlinuz-2.6.9-EC initrd=/boot/initrd-2.6.9-EC.img root=/dev/sda2 selinux=0
In case of trouble — No network
Red Hat's installer (which CentOS uses) will often choose the wrong Ethernet driver. If you are asked no questions about networking during the installation, and the system comes up with no networks, you will need to fix it:
-
Figure out which Ethernet driver is correct.
There are a lot of them, but it is likely
the
de4x5driver. Try this:
# modprobe de4x5
# ifconfig eth0
If you see output abouteth0,then it worked! If not, remove that driver:
# rmmod de4x5
and try another. -
Modify
/etc/modprobe.confby changing this line:
alias eth0 tulip
to the correct Ethernet driver, probably this:
alias eth0 de4x5
-
It seems that the DEC folks never fully documented
their hardware to the Linux community,
and the command
modprobe de4x5tells you to go read the source code. Thanks.... If you need to add arguments to make your Alpha play nicely with your Ethernet switch, it's done like this in/etc/modprobe.conf:
alias eth0 de4x5
options eth0 args="autosense=100baseT fdx"
Your choices for those arguments include:
fdx, FDX,
				autosense=10Mb autosense=100Mb
				autosense=TP, autosense=TP_NW,
				autosense=BNC, autosense=AUI, autosense=BNC_AUI,
				autosense=AUTO
And yes,autosense=AUTOworks differently than simply letting it autosense on its own. That's thanks to DEC/Compaq/HP making chips with the same marking that behave differently, and not fully explaining this to the driver authors... -
Create (or correct) the configuration file
/etc/sysconfig/network-scripts/ifcfg-eth0,changing your IP address as appropriate:
DEVICE=eth0
PROTO=static
ONBOOT=yes
IPADDR=1.2.3.4
NETMASK=255.255.255.0
-
Correct the configuration file
/etc/sysconfig/network,changing your hostname and default router as appropriate:
HOSTNAME=foo.example.com
NETWORKING=static
GATEWAY=1.2.3.254
-
Correct the configuration file
/etc/resolv.conf,changing your domain and nameserver as appropriate:
domain example.com
nameserver 2.3.4.5
-
Restart and verify your networking:
# /etc/init.d/network restart
# ifconfig
# route
# nslookup www.google.com
# traceroute www.google.com
Will not boot without blank CD in the drive
Someone told me about a mysterious problem. They had replaced the original CD drive and set the jumper on the replacement to "Master" as it was the only device on the IDE cable.
The system would not boot unless there was a CD in the drive, even a blank one was fine.
The fix is to set the drive's jumper to "Cable Select".
The same person told me that his system was labeled externally as a 500a, but it functions as a 500au(x) and is capable of running NT, VAX, and Unix. There are no USB ports. However, the processor is reported as a 2116-A and the processor board is laid out for USB support, there were just no USB component installed. He was also able to bump the processor speed up from 500 MHz to 566 MHz. This was based on another Miata owner's posting on a German forum, detailing the CPU switch settings for speeds from 200 through 800 MHz.
In case of trouble — Need to break in as root on the console
>>>boot -flags "0 single"
So how fast are these things, really?
Not terribly fast at all, compared to recently built computers.
Compare the BogoMIPS reported in /proc/cpuinfo
and assume it will be significantly worse than that.
I compared a DS10 and Miata to a 1837 MHz AMD Athlon, all of them running Linux.
For mostly integer math (running a crude brute-force test for primes), I saw performance about 4 times worse than predicted by the ratio of BogoMIPS values.
For a loop of summing up ratios of sums of double-precision floating-point numbers, it was between 4 and 5 times worse than predicted by the ratio of BogoMIPS values.
For a loop of summing up square roots of double-precision floating-point numbers, it was more like 6.5 (DS10) to 40 (Miata) times worse than predicted by the ratio of BogoMIPS values.