
Commands for Linux Virtualization
Linux Virtualization
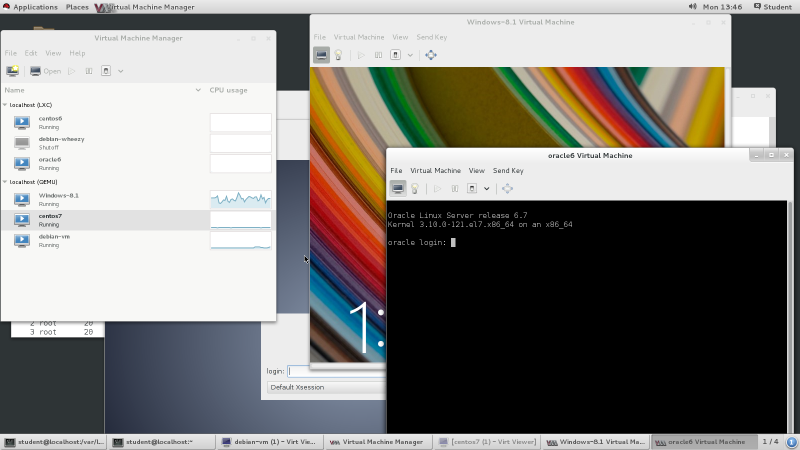
Look at the mixture of operating system
environments visible through the one desktop
shown below.
This is a Red Hat Enterprise Linux system running in
graphical mode, with five virtualized systems running
on top of it, both containers and full virtual machines.
The most colorful one is a Windows 8.1 virtual machine.
In front of that is an Oracle Linux container system
in text mode, as appropriate for a server.
There is a Debian graphical desktop toward the back.
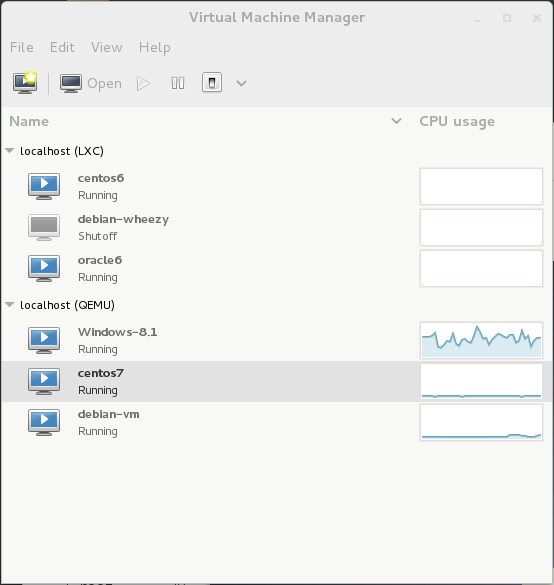
Also listed as runnning in the Virtual Machine Manager
but without connections to their consoles at the
moment are a CentOS 6 container and a
CentOS 7 virtual machine.
All this and more make up our goal.
We want to control multiple operating systems running
in multiple modes of operation, and do that through a
common interface.
We want to be able to do this across a data center,
where the containers and virtual machines are spread
across multiple physical platforms but we can easily
control them all from one console.
From the command line for efficiency and scalability
through scripting, and from a graphical interface for
easy visibility and insight.
We need to get some terminology out of the way first. It can get a little confusing, but if we don't get it right we may end up doing the opposite of what we want.
Full virtualization has the hypervisor presenting virtual CPUs, memory, networking, and more, and the guest operating system is convinced that it is running on real hardware. The hypervisor must do dynamic binary translation to carry this off. It pretends to be the real hardware, ideally in real time but of course with some added latency.
Paravirtualization is when the guest
operating systems uses customized device drivers to access
the virtualized hardware.
The guest OS is not just aware that it is running on top
of virtualization, it is using different drivers to run
a little differently.
See Linux systems running on Xen hypervisors, for example.
Amazon Web Services' EC2 (or Elastic Compute Cloud)
is Linux on Xen.
The disk devices are not the usual /dev/sd*
but instead /dev/xvd*, so named by the
paravirtualization device driver for Xen-virtualized
disk devices.
EC2 is IaaS or Infrastructure-as-a-Service.
Full virtualization can provide the greatest compartmentalization between virtual machines and between virtual machines and the host. That is, the greatest separation of file systems, process tables, and UID/GID identity or credentials. The hypervisor can even emulate different hardware — maybe the guest is Android on ARM while the host is Linux on x86_64. As you might already imagine, full virtualization, especially of foreign architectures, is slower.
Hardware-assisted virtualization
is an expanded CPU instruction set that lets the CPU do some
of the virtualization work directly in hardware instead of
the hypervisor processes in user space.
Hardware-assisted virtualization has been around at least
since IBM CP-40 systems in the 1960s, but the Intel/AMD x86
architecture only added this around 2005.
Intel calls their version VT-x, AMD's is AMD-V.
Look for the feature in /proc/cpuinfo, the
kernel's notion of the CPU.
You should find vmx on Intel CPUs and
svm on AMD.
You need it as virtualization is
significantly slower without it.
$ egrep 'vmx|svm' /proc/cpuinfo
With hardware-assisted virtualization, performance can reach 95–99% of the bare-metal speed.
Hybrid virtualization is when you have hardware-assisted virtualization supporting paravirtualization.
Finally, operating system virtualization has become popular in Linux. There is a single kernel shared by the host and the guest systems, but some compartmentalization of processes, memory, and file system. Linux Containers (or LXC) are virtualization technology, while Docker is an efficient and scaleable management and deployment scheme for LXC. More recently, Docker added its own virtualization technology for improved performance.
We can place these along a spectrum from best performance to best compartmentalization:
| Best Performance | Best Compartmentalization | ||
| Operating System Virtualization | Paravirtualization | Full System Virtualization | |
| chroot |
Linux Containers / LXC Docker |
KVM QEMU |
KVM QEMU |
| separate file systems, becoming even more separate as we move to full system virtualization | |||
| separate users/groups and process tables | |||
| separate kernels | |||
Chroot has been around for ages but only recently has it come to be widely considered as a form of virtualization. Linux Containers or LXC have their own UID/GID and process space, and Docker is a system for efficiently managing containers and sharing their design. KVM or Kernel-Based Virtual Machine is functionality provided by the kernel, and QEMU is the user-space mechanism for controlling KVM-based virtual machines. Both are used whether you're doing paravirtualization or full system virtualization, but QEMU is much more obviously involved in full virtualization, especially when emulating foreign architectures.
chroot
You must run chroot as the user root.
You can simply name the new file system root and it will
run the /bin/sh program within it:
# chroot /var/chroots/myproject
You can specify other non-root UID/GID credentials:
# chroot --userspec=fred:wheel /var/chroots/myproject
You can name the root of the chroot
and also the path to the program to run within it:
# chroot /var/www /sbin/httpd
Note that the above implies that /var/www/sbin/httpd
exists, and it is either a statically linked binary or else
/var/www/lib is populated with the needed
shared libraries usually found in /lib.
Furthermore, the web root will be beneath the new file system,
so the web pages in /var/www/var/www/htdocs/*,
log files in /var/www/var/www/log/*, and so on.
And, very likely, /var/www/dev/ is partially
populated with device nodes, at least with null
and random.
The UNIX family has had chroot for ages,
and it is only with the recently growing interest in
Linux-based virtualization that it has been considered
anything but pure compartmentalization.
Its syntax has been simple and stable for a long time,
unlike...
lxc
Linux Containers or LXC
has been a rapidly evolving area,
and the commands may vary from one platform to another.
For example, compare lxc-ls on Debian
and Red Hat, at least at the time of writing this:
$ lxc-ls --version
1.0.7
$ lxc-ls --fancy
NAME        STATE    IPV4        IPV6  AUTOSTART
------------------------------------------------
container1  RUNNING  10.0.3.192  -     NO
container2  STOPPED  -           -     NO
$ lxc-info -n container1
Name:           container1
State:          RUNNING
PID:            4140
IP:             10.0.3.192
CPU use:        0.66 seconds
BlkIO use:      72.00 KiB
Memory use:     3.22 MiB
KMem use:       0 bytes
Link:           veth22AUQI
 TX bytes:      1.68 KiB
 RX bytes:      5.33 KiB
 Total bytes:   7.01 KiB
$ lxc-info -n container2
Name:           container2
State:          STOPPED
That's on Debian, where /usr/bin/lxc-ls
is a 15,958 byte Python script.
On Red Hat it is from a package of the same name and version,
lxc and 1.0.7, but it is a 2,837 byte
POSIX shell script and the command
lxc-ls --version
yields a report on the version of ls!
Check the manual pages, try running the command with parameters
of just -h and --help, and then
be aware that other syntax may also be accepted.
For example, at least with version 1.0.7 on Red Hat Enterprise
Linux 7, these three commands are equivalent and the second
is not mentioned in the manual page:
# lxc-info -n mycontainer

# lxc-info --name mycontainer

# lxc-info --name=mycontainer
The following uses the shortest -n syntax,
and uses name for the name of the
specified container.
Most commands have more options,
the following shows enough to get you started.
Common LXC Commands
lxc-ls
ls /var/lib/lxc
lxc-info -n name
init process, CPU and memory
use) and container-side network information.
lxc-start -n name
lxc-stop -n name
The current terminal will be the container's console, you will see it start and then run its default program, maybe a login prompt. Use the
-d option for
daemon or detached mode.
lxc-console -n name
-d option,
this attaches the current terminal to the console.
lxc-execute -n name -- command
name container
and execute command within it.
lxc-monitor -n name
namecontainer,
displaying one line per state change:
STARTING, RUNNING, STOPPING, STOPPED.
lxc-autostart -n name
lxc-autostart --disable -n name
ls /usr/share/lxc/templates
lxc-create --template=debian -h
lxc-create --template=debian -r wheezy -n name
Second, see the list of specific options available for the
debian
distribution.
Third, create a container from that template, selecting the
wheezy
release option and
naming it name.
lxc-clone -o orig -n new
new
as a clone of existing original container
orig.
lxc-destroy -n name
Warning: This is very different from the
destroy parameter
to the virsh command,
shown below!
Also check out
incus,
a container and virtual machine manager that was forked
off LXD after Canonical took that over.
The linuxcontainers.org development team has been
extending and supporting it since then.
You can try it out at
https://linuxcontainers.org/incus/try-it/,
and there is a
lxd-to-incus
migration tool.
LXC XML Files
A container is defined by the configuration file
/var/lib/lxc/name/config,
which contains comments (from "#" to the end of the line)
and simple feature = value
assignments.
The libvirt system, described below, may support converting the LXC native configuration into an XML description with this syntax. Again, it depends on the capabilities of the version you have installed:
# virsh dom-from-xml lxc-tools /var/lib/lxc/name/config
If so, the result would be like the following. If not, the appropriate XML file can be created by hand:
<domain type='lxc'>
  <name>mycontainer</name>

  <!-- Performance Settings -->
  <memory>500000</memory>
  <vcpu>1</vcpu>

  <devices>
    <emulator>/usr/libexec/libvirt_lxc</emulator>

    <!-- The root of our container file system -->
    <filesystem type='mount'>
      <source dir='/var/lib/lxc/mycontainer/rootfs'/>
      <target dir='/'/>
    </filesystem>

    <interface type='network'>
      <source network='default'/>
    </interface>
    <console type='pty' />
  </devices>

  <os>
    <type>exe</type>
    <init>/sbin/init</init>
  </os>

  <clock offset='utc'/>
  <on_poweroff>destroy</on_poweroff>
  <on_reboot>restart</on_reboot>
  <on_crash>destroy</on_crash>

</domain>
Docker
Docker
is a mechanism for managing and sharing
containers.
It uses
UnionFS
to very efficiently utilize storage.
It was initially built on top of LXC, but it now defaults
to using its own libcontainer
operating system virtualization mechanism.
The expectation is that you will use Docker to create
lightweight containers dedicated to specialized single tasks,
so it uses copy-on-write to very quickly create
those new containers.
A Docker image is a template from which a container may be constructed. A registry is a distribution point for images, analogous to an RPM or APT repository or repo. They can be public, shared with the Internet, or kept private within your organization. You can pull an image from a registry and run it on the local machine. If you make some improvements in that container, you can then push your new image to a registry so others can use it.
Let's say that our organization has stored an image
named centos, a container built from a
basic CentOS installation.
I could pull that to my system and make changes,
adding the Apache web server and setting up some
extra logging, and then push the result
into our private registry.
You could then pull down my image and add
a database back end, and then push your
result into the registry.
Someone else in our organization could then pull
down your image and run it.
It seems like our registry must be growing quickly, with three
images available — the original, the original plus
my web server and logging, and that plus your data base work.
But only the initial image will be a full image.
My modifications, and your modifications to mine, are
stored as just the changes needed to build the desired
image.
Common Docker Commands
docker ps
--all or -a
to include those that aren't currently running.
docker history name
name.
docker inspect name
name,
which can be an image or a container.
docker images
systemctl start docker
docker run -it --rm centos /bin/bash
centos
image, using the
-i (interactive) and
-t (terminal) options
to give me an interactive console terminal,
and the --rm option to remove the
container when its job, the Bash shell,
terminates.
docker run -p 8080:80 --rm centos /usr/sbin/httpd
centos
image, without an interactive console (no
-i or -t),
running the /usr/sbin/httpd
web server,
and mapping host TCP port 8080 to the
container's port 80.
A client can now connect to TCP port 8080 on
the host and that tunnels through to
TCP port 80 on the container.
docker create mycentos centos
mycentos
from the centos container.
docker commit mycentos webserver
mycentos,
generate a new image webserver
for future use.
docker tag webserver registry.example.com:5000/myproject/webserver
docker push registry.example.com:5000/myproject/webserver
webserver with the
hostname and TCP port of our registry and
the image's name.Then, push that image with that tag to the registry.
docker rm webserver
webserver.
docker rmi mycentos
webserver.
You can also use a Dockerfile, analogous to a Makefile, to specify how to create a new image by modifying and starting an existing one.
# cat /path/to/source/directory/Dockerfile

## Dockerfile to quickly generate a web server
##
## Start with this base image:
FROM centos
## Run this command before committing the image:
RUN yum -y install httpd
## Connect this shared volume on the host
## containing an Apache configuration and logs:
VOLUME ["/var/www"]
## Load a web site into the image file system:
ADD site1.tar.gz /var/www/htdocs
## Set an environment variable within the container:
ENV APACHE_HOME /var/www
## Run this command when starting the container:
CMD ["/usr/sbin/httpd"]
We could now build a container based on that Dockerfile.
We will give it a fully qualified and meaningful repository,
name, and tag with the -t option.
In this example it's version (or tag) 1.0, named
webserver in the project
repository.
# docker build -t project/webserver:1.0
QEMU
QEMU is a generic open source machine emulator. It does full-system virtualization, where you run a separate kernel on the VM and that kernel sees a complete platform with your specialized number of CPUs, amount of RAM, disks, and Ethernet, USB, and audio interfaces. QEMU can emulate a different architecture. You can run a QEMU command on your Linux/x86_64 platform and have it emulate: an ARM system on which you run Android, or an UltraSPARC on which you run Solaris, or simply an x86_64 platform on which you run Windows.
If you are on x86_64 hardware, starting a virtual machine
with the virsh or virt-install
commands described below actually starts a
qemu-system-x86_64 process to emulate
the virtual machine's platform.
To emulate a different architecture, you must run the
appropriate qemu-system-* command and
parameters.
For example, let's say you want to run Android on
emulated ARM, and you want the terminal in which you
start it to be connected to a serial console in addition
to the graphical Android interface that will appear in
a new window.
You must:
- Specify which specific ARM variant and the amount of RAM.
- Pass the kernel and initial RAM disk image files.
- Specify the file containing the disk image, and indicate that it should appear to be on an SD memory card.
- Specify that the Android console is the first serial port, and that the serial port is (virtually) connected to your terminal.
Assembled together, that becomes:
# qemu-system-arm -machine vexpress-a9 -m 1024\
	-kernel vmlinuz -initrd initrd.gz \
	-drive file=android-disk.qcow2,if=sd \
	-append "init=/init androidboot.console=ttyAMA0" -serial stdio
Carefully research the specifics, and be aware that the details vary not only from one architecture to another but also from one version of the QEMU tools to another. This page shows how one person got Fedora to run on a wide variety of architectures including AMD64, ARMel, ARMhf, i386, MIPS, PowerPC, and SPARC, and provides downloadable disk images in qcow2 format.
libvirt and virsh
libvirt is a toolkit for interacting with the virtualization capabilities of Linux. It includes command-line tools, a graphical user interface, and an application programming interface or API for C/C++, C#, Java, Perl, Python, PHP, Ruby, and OCaml so you can write your own command-line or graphical tools. libvirt can control a wide variety of virtualization technologies — KVM/QEMU, LXC, Xen, VirtualBox, OpenVZ, and more.
libvirt refers to hypervisors in URI format:
scheme://[[user@]hostname]/[session][?option1=value1[&option2=value2]...]
For example:
		lxc:///

		xen:///

		vmwareplayer:///session

		qemu+ssh://root@somehostname/system

		qemu+tls://somehostname/system

		esx://somehostname/?transport=http
In these URIs session generally refers to
the user's access to the hypervisor and
system to the system hypervisor.
The virsh command is a do-it-all command-line
interface to libvirt.
Use -c URI to specify the
hypervisor connection.
As an example, the parameters list --all
will list all virtual machines, running or not,
known to the hypervisor.
# virsh -c lxc:/// list --all
 Id    Name                           State
----------------------------------------------------
 1833  centos6                        running
 -     debian-wheezy                  shut off
 3493  oracle6                        running

# virsh -c qemu:///system list --all
 Id    Name                           State
----------------------------------------------------
 6     Windows-8.1                    running
 8     centos7                        running
 9     debian-vm                      running
This means that we have two equivalent ways of manipulating containers:
Common Container Operations in
virsh and lxc-*
virsh -c lxc:/// list --all
lxc-ls --fancy
virsh -c lxc:/// start centos
lxc-start -n centos
virsh -c lxc:/// shutdown centos
lxc-stop -n centos
virsh -c lxc:/// reboot centos
lxc-stop -r -n centos
virsh -c lxc:/// create ...
lxc-create ...
virsh -c lxc:/// undefine newcontainer
lxc-destroy -n newcontainer
Containers run under the host kernel, "rebooting" or shutting them down only controls the processes running within the container.
Full system virtualization with QEMU and KVM means a
separate kernel.
Several virsh commands have analogies to
actions taken on a physical machine:
virsh Command Analogies
virsh start myvm
virsh shutdown myvm
# systemctl poweroff
virsh reboot myvm
# systemctl reboot
virsh destroy myvm
lxc-destroy,
which deletes a container!
virsh reset myvm
virt-manager is a nice graphical tool
in which you can monitor, control, and create
virtualized systems.
Use the File | Add Connection
menu choice to add connections to other
hypervisor schemes.
In this view, lxc:/// and qemu:///system
are in use.
NOTICE:
With the release of RHEL 8, Red Hat has deprecated
virt-manager in favor of the
Cockpit browser-based management
interface listening on TCP/9090.
libvirt XML Files
Virtual machines are described by XML.
You can dump the XML description to standard output
with virsh dumpxml
You could save that XML output in a file,
edit the file to change the name string,
remove the uuid and all mac address
values, and then define a new virtual machine with
with virsh define.
<domain type='kvm'>
  <name>myvm</name>
  <uuid>8b9ad37b-9ecb-444f-9f28-298f0bbad29b</uuid>
  <memory unit='KiB'>524288</memory>
  <currentMemory unit='KiB'>524288</currentMemory>
  <vcpu placement='static'>1</vcpu>
  <os>
    <type arch='x86_64' machine='pc-i440fx-rhel7.0.0'>hvm</type>
    <boot dev='hd'/>
  </os>
  <features>
    <acpi/>
    <apic/>
    <pae/>
  </features>
  <clock offset='utc'/>
  <on_poweroff>destroy</on_poweroff>
  <on_reboot>restart</on_reboot>
  <on_crash>restart</on_crash>
  <devices>
    <emulator>/usr/libexec/qemu-kvm</emulator>
    <disk type='file' device='disk'>
      <driver name='qemu' type='qcow2' cache='none'/>
      <source file='/usr/local/containers/myvm.qcow2'/>
      <target dev='vda' bus='virtio'/>
      <address type='pci' domain='0x0000' bus='0x00' slot='0x05' function='0x0'/>
    </disk>
    <controller type='usb' index='0'>
      <address type='pci' domain='0x0000' bus='0x00' slot='0x01' function='0x2'/>
    </controller>
    <controller type='pci' index='0' model='pci-root'/>
    <controller type='virtio-serial' index='0'>
      <address type='pci' domain='0x0000' bus='0x00' slot='0x04' function='0x0'/>
    </controller>
    <interface type='network'>
      <mac address='52:54:00:7a:fe:26'/>
      <source network='default'/>
      <model type='virtio'/>
      <address type='pci' domain='0x0000' bux='0x00' slot='0x03' function='0x0'/>
    </interface>
    <serial type='pty'>
      <target port='0'/>
    </serial>
    <console type='pty'>
      <target type='serial' port='0'/>
    </console>
    <channel type='spicevmc'>
      <target type='virtio' name='com.redhat.spice.0'/>
      <address type='virtio-serial' controller='0' bus='0' port='1'/>
    </channel>
    <input type='tablet' bus='usb'/>
    <input type='mouse' bus='usb'/>
    <graphics type='spice' autoport='yes'/>
    <video>
      <model type='qxl' ram='65536' vram='65536' heads='1'/>
      <address type='pci' domain='0x0000' bus='0x00' slot='0x02' function='0x0'/>
    </video>
    <memballoon model='virtio'>
      <address type='pci' domain='0x0000' bus='0x00' slot='0x06' function='0x0'/>
    </memballoon>
  </devices>
</domain>
libvirt Networking
There is a similar virsh net-dumpxml command,
yielding the XML definition of a virtual network.
<network>
  <name>default</name>
  <uuid>f37ba69f-6b2c-4775-82d4-6f03a392acb7</uuid>
  <forward mode='nat'>
    <nat>
      <port start='1024' end='65535'/>
    </nat>
  </forward>
  <bridge name='virbr0' stp='on' delay='0' />
  <ip address='192.168.122.1' netmask='255.255.255.0'>
    <dhcp>
      <range start='192.168.122.2' end='192.168.122.254' />
    </dhcp>
  </ip>
</network>
Let's say that we have just the one net and virtual bridge so far:
# virsh net-list --all
 Name                 State      Autostart     Persistent
----------------------------------------------------------
 default              active     yes           yes
# brctl show
bridge name     bridge id               STP enabled      interfaces
docker0         8000.56847afe9799       no
virbr0          8000.000000000000       yes
We can dump the virtualized network XML description into a file, edit it, and define a new net:
# virsh net-dumpxml default > /tmp/newnet.xml
# vim /tmp/newnet.xml
   [... change name from "default" to "newnet",
        virtual bridge name from "virbr0" to "virbr1",
	and IP address range to 192.168.123.0/24 ...]
# virsh net-define /tmp/newnet.xml
Network newnet defined from /tmp/mynet.xml

# virsh net-list --all
 Name                 State      Autostart     Persistent
----------------------------------------------------------
 default              active     yes           yes
 newnet               inactive   no            yes
# brctl show
bridge name     bridge id               STP enabled      interfaces
docker0         8000.56847afe9799       no
virbr0          8000.000000000000       yes
The new net is there but the new virtual bridge is not. We must start the new net.
# virsh net-start newnet
Network newnet started

# virsh net-autostart newnet
Network newnet marked as autostarted

# virsh net-list --all
 Name                 State      Autostart     Persistent
----------------------------------------------------------
 default              active     yes           yes
 newnet               active     yes           yes
# brctl show
bridge name     bridge id               STP enabled      interfaces
docker0         8000.56847afe9799       no
virbr0          8000.000000000000       yes
virbr1          8000.52540016cb49       yes              virbr1-nic