How to Multiboot OpenBSD and Windows 7
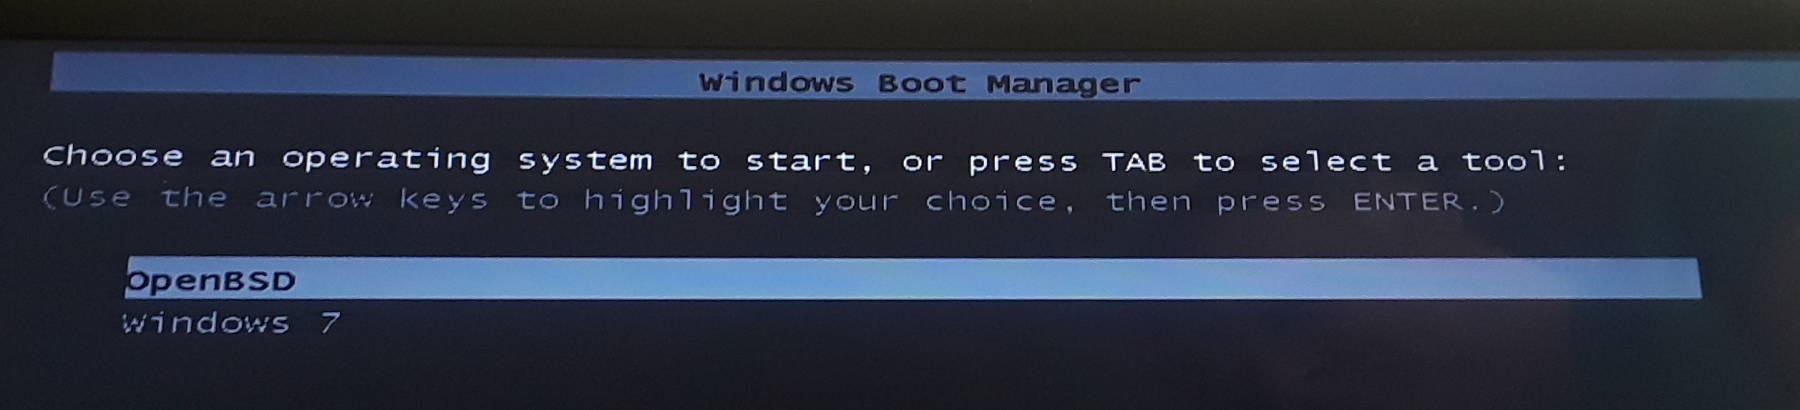
Choosing Between OpenBSD and Windows at Boot Time
I need to use Windows once in a while. Not very often, but I write and teach for a training company that insists on doing everything with actual Microsoft Office, as they use enormously complex document templates that break if handled with anything else. LibreOffice works just fine for everything else I do, but once in a while I need actual Office. My laptop's primary operating system was OpenBSD, making it quite stable, secure, and efficient.* However, VMware does not run on OpenBSD. My choices for occasional Windows use were:
- Continue to run Windows within the QEMU emulation as I was already doing.
- Run Windows by switching disk drives each time I wanted to change operating systems.
- Run Windows by booting from an external hard drive connected via USB.
- Install a new, larger disk, install both operating systems, and change operating systems with the primary boot loader.
Choice #1, using QEMU, just didn't provide acceptable performance.
Choice #2 wasn't acceptable. I would quickly lose some of the small screws, and how long after that until the SATA connector or cable became intermittent?
Choice #3 seemed attractive at first. Despite the Windows installer refusing to install onto USB media, there are ways to accomplish this with scripted installers. You need a machine already running Windows 7, the Windows Automated Installation Kit (a free download from Microsoft), and fujianabc's explanation and installer bundle. Yes, I was able to make an external drive that boots and runs Windows, not just a portable installer that so many pages offer instead. However, I had to create it somewhere other than my OpenBSD-only laptop, and it would always fail with the notorious 0x0000007b Blue Screen of Death on my laptop. Something about the different USB chipset, I think.
But that was just fine, I really didn't want to have to carry any extra hardware. If I'm only going to run one OS at a time, it would be better to do it off the same hardware.
Meanwhile, my 8-megapixel camera was filling my laptop's disk space. Its original 320 gigabyte disk just wasn't big enough.
My plan was to install a new, larger disk, install both Windows 7 and OpenBSD, and set up the boot loader to select between the two.
I would use the Windows boot loader because it would do what I needed and any clueless Windows "restoration" of the boot loader during a Service Pack or other update would cause no harm. The laptop would run a Microsoft product for 10 seconds at each boot, and then usually default to a better operating system.
Back Up Existing Data
Make sure this is done correctly before proceeding!
Fortunately, this is easy. Plug an external drive into a USB port and do what you see in the command prompt here.
% pkg_info > package-list
% su
# mount /dev/sd1i /mnt
# df -h
# du -sh /home
# cd /home
# gtar cf /mnt/backup.tar *
# echo $?
# ls -lh /mnt/backup.tar
# umount /mnt
That file package-list
will be useful later.
The mount syntax assumes that there is
one internal SATA disk, which will be sd0,
and you just have the one USB drive connected.
The df and du
make sure that there is enough space.
Using gtar instead of the default
/bin/tar
can help if any unusually named files are involved.
The echo
checks the exit status of the archive creation,
you want to see a "0" here!
As an alternative, you could use the
tar over
ssh
trick to back up the data across the network.
Back Up the Windows License Key
Recover the Windows License Key with WMICIf you will be re-installing Windows, make sure that you're ready to proceed!
You can
use the wmic tool
to recover the Windows license key.
Install Windows
Shut the system down and install the new disk drive.
What to do with the old drive? Set it aside in a safe place for now. You could always switch back to the old disk if things don't work out.
When you are absolutely certain that you have your data
installed onto the new hardware, you can either beat the
old disk with a large hammer or install it in
an external drive enclosure and continue to use it.
Remember that dd
and /dev/zero
can help you sanitize the old disk before continued use.
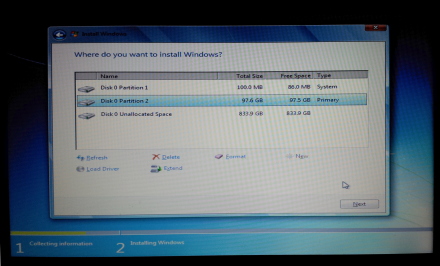
The disk just has two partitions so far, the System partition for the boot loader and the second for Windows.
Format the first two partitions. The third partition will be used for OpenBSD.
In the first picture above you see what happens when you tell the Windows installer that you want just one 100,000 MB partition for Windows. It gives you that, but first it insists on a 100 MB partition for the boot loader, labeled here as "System".
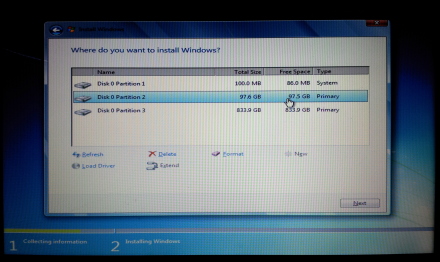
At right I have taken the next step and told it to go ahead and put the rest of the disk into an unused partition. I will tell it to go ahead and format the first two.
Windows starts counting disks at #0 and partitions at #1. So we're looking at the first, second and third partitions on the first disk.
I was curious. What's in that mysterious System partition?
This is the minimally bootable system. Windows 7 supports BitLocker, commonly called "whole-disk encryption". But if the entire disk was encrypted, the system could not boot! So BitLocker is really "almost all of the disk encryption", except for the boot block itself with the MBR, this 100 MB "system partition" with the boot loader and kernel, plus any non-Windows partitions. You can assign a drive letter to this partition, but by default the Windows installer does not. So, this isn't seen from within Windows, which thinks that its C: drive is the first one on the disk.
After this project was completed, I booted the laptop from a Knoppix CD. As you see in the first command's output, I had already changed the third partition's ID to 0xa6. This is the Windows 7 boot loader, it's not very exciting. For whatever reason, only English has the text for the memory test function. I have artificially wrapped some enormously long lines here:
sh-3.1# fdisk -l /dev/sda

Disk /dev/sda: 1000.2 GB, 1000204886016 bytes
255 heads, 63 sectors/track, 121601 cylinders
Units = cylinders of 16065 * 512 = 8225280 bytes

   Device Boot      Start         End      Blocks   Id  System
/dev/sda1   *           1          13      102400    7  HPFS/NTFS
Partition 1 does not end on cylinder boundary.
/dev/sda2              13       12749   102297600    7  HPFS/NTFS
Partition 2 does not end on cylinder boundary.
/dev/sda3           12749      121602   874359808   a6  OpenBSD
Partition 3 does not end on cylinder boundary.

sh-3.1# file -s /dev/sda1
/dev/sda1: x86 boot sector, code offset 0x52, OEM-ID "NTFS    ",	\
	sectors/cluster 8, reserved sectors 0, Media descriptor 0xf8,	\
	heads 255, hidden sectors 2048, dos < 4.0 BootSector (0x80)

sh-3.1# mount /dev/sda1 /media/sda1

sh-3.1# ls -l /media/sda1
total 588
-rwxrwxrwx 1 root root   8192 Jun 11 07:21 BOOTSECT.BAK
drwxrwxrwx 1 root root   4096 Jun 11 07:21 Boot
drwxrwxrwx 1 root root      0 Jun 11 06:22 System Volume Information
-rwxrwxrwx 1 root root 383786 Nov 20  2010 bootmgr
-rwxrwxrwx 1 root root 203836 Jun 11 00:22 grldr
-rwxrwxrwx 1 root root      0 Jun 11 00:22 winx.ld

sh-3.1# file /media/sda1/*
/media/sda1/BOOTSECT.BAK:              x86 boot sector, code offset 0x52,  \
	OEM-ID "NTFS    ", sectors/cluster 8, reserved sectors 0,	   \
	Media descriptor 0xf8, heads 255, hidden sectors 2048,		   \
	dos < 4.0 BootSector (0x80)
/media/sda1/Boot:                      directory
/media/sda1/System Volume Information: directory
/media/sda1/bootmgr:                   DOS executable (COM)
/media/sda1/grldr:                     DOS executable (COM)
/media/sda1/winx.ld:                   empty

sh-3.1# ls -l /media/sda1/System\ Volume\ Information/
total 20
-rwxrwxrwx 1 root root 20480 Jun 11 06:22 tracking.log

sh-3.1# ls -l /media/sda1/Boot/
total 596
-rwxrwxrwx 1 root root  28672 Jun 12 11:30 BCD
-rwxrwxrwx 1 root root  25600 Jun 12 11:27 BCD.LOG
-rwxrwxrwx 2 root root      0 Jun 11 07:21 BCD.LOG1
-rwxrwxrwx 2 root root      0 Jun 11 07:21 BCD.LOG2
-rwxrwxrwx 1 root root  65536 Jun 11 07:21 BOOTSTAT.DAT
drwxrwxrwx 1 root root      0 Jun 11 07:21 Fonts
drwxrwxrwx 1 root root      0 Jun 11 07:21 cs-CZ
drwxrwxrwx 1 root root      0 Jun 11 07:21 da-DK
drwxrwxrwx 1 root root      0 Jun 11 07:21 de-DE
drwxrwxrwx 1 root root      0 Jun 11 07:21 el-GR
drwxrwxrwx 1 root root      0 Jun 11 07:21 en-US
drwxrwxrwx 1 root root      0 Jun 11 07:21 es-ES
drwxrwxrwx 1 root root      0 Jun 11 07:21 fi-FI
drwxrwxrwx 1 root root      0 Jun 11 07:21 fr-FR
drwxrwxrwx 1 root root      0 Jun 11 07:21 hu-HU
drwxrwxrwx 1 root root      0 Jun 11 07:21 it-IT
drwxrwxrwx 1 root root      0 Jun 11 07:21 ja-JP
drwxrwxrwx 1 root root      0 Jun 11 07:21 ko-KR
-rwxrwxrwx 1 root root 485760 Nov 20  2010 memtest.exe
drwxrwxrwx 1 root root      0 Jun 11 07:21 nb-NO
drwxrwxrwx 1 root root      0 Jun 11 07:21 nl-NL
drwxrwxrwx 1 root root      0 Jun 11 07:21 pl-PL
drwxrwxrwx 1 root root      0 Jun 11 07:21 pt-BR
drwxrwxrwx 1 root root      0 Jun 11 07:21 pt-PT
drwxrwxrwx 1 root root      0 Jun 11 07:21 ru-RU
drwxrwxrwx 1 root root      0 Jun 11 07:21 sv-SE
drwxrwxrwx 1 root root      0 Jun 11 07:21 tr-TR
drwxrwxrwx 1 root root      0 Jun 11 07:21 zh-CN
drwxrwxrwx 1 root root      0 Jun 11 07:21 zh-HK
drwxrwxrwx 1 root root      0 Jun 11 07:21 zh-TW

sh-3.1# file /media/sda1/Boot/B*
/media/sda1/Boot/BCD:          Windows NT/XP registry file
/media/sda1/Boot/BCD.LOG:      Windows NT/XP registry file
/media/sda1/Boot/BCD.LOG1:     empty
/media/sda1/Boot/BCD.LOG2:     empty
/media/sda1/Boot/BOOTSTAT.DAT: GLS_BINARY_LSB_FIRST

sh-3.1# ls /media/sda1/Boot/Fonts/
chs_boot.ttf  cht_boot.ttf  jpn_boot.ttf  kor_boot.ttf	wgl4_boot.ttf

sh-3.1# ls -l /media/sda1/Boot/Fonts
total 11700
-rwxrwxrwx 1 root root 3694080 Jun 10  2009 chs_boot.ttf
-rwxrwxrwx 1 root root 3876772 Jun 10  2009 cht_boot.ttf
-rwxrwxrwx 1 root root 1984228 Jun 10  2009 jpn_boot.ttf
-rwxrwxrwx 1 root root 2371360 Jun 10  2009 kor_boot.ttf
-rwxrwxrwx 2 root root   47452 Jun 10  2009 wgl4_boot.ttf

sh-3.1# ls -l /media/sda1/Boot/e*
/media/sda1/Boot/el-GR:
total 96
-rwxrwxrwx 2 root root 94800 Jul 13  2009 bootmgr.exe.mui

/media/sda1/Boot/en-US:
total 128
-rwxrwxrwx 2 root root 85056 Jul 13  2009 bootmgr.exe.mui
-rwxrwxrwx 2 root root 43600 Apr 12  2011 memtest.exe.mui

/media/sda1/Boot/es-ES:
total 92
-rwxrwxrwx 2 root root 90192 Jul 13  2009 bootmgr.exe.mui

sh-3.1# file /media/sda1/Boot/en-US/*
/media/sda1/Boot/en-US/bootmgr.exe.mui: MS-DOS executable PE  for MS Windows (DLL) (GUI) Intel 80386 32-bit
/media/sda1/Boot/en-US/memtest.exe.mui: MS-DOS executable PE  for MS Windows (DLL) (GUI) Intel 80386 32-bit
Back to the Windows installation process. Let the installer crank along. It copies, decompresses and installs files from the DVD onto the new file system on the new disk. When it gets to "Completing installation" it's pretty close.
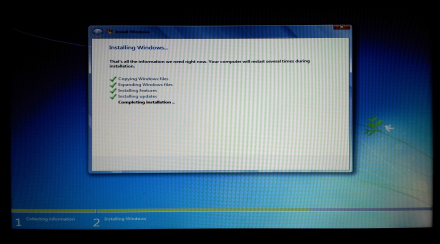
Wait for the files to be copied to the disk.
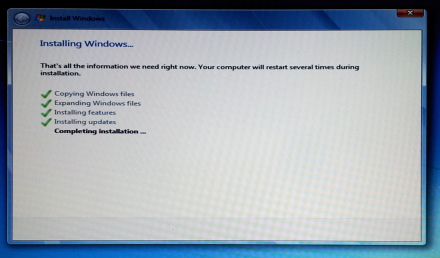
The installer will close soon.
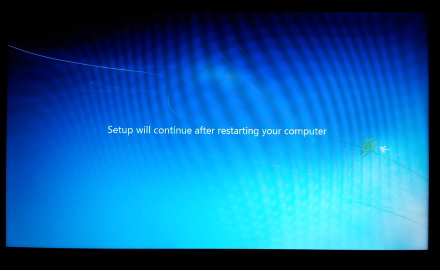
Remove the DVD so the system boots from the disk.
When it starts to reboot, remove the DVD so it boots from the disk.
The precise sequence of events is not critical, I figured that I might as well go ahead and let it boot Windows from the new disk for its initial boot and the rest of the setup. That way, if anything went wrong in the Windows setup and I had to start over, I would be wasting less time.
OK, Windows is installed, on to the next operating system!
Install OpenBSD
I booted with the relatively small CD media OpenBSD uses for online installation. Comcast provided about 21 Mbps download and 5 Mbps upload speeds when I did this, so I didn't mind waiting for the installation to download.
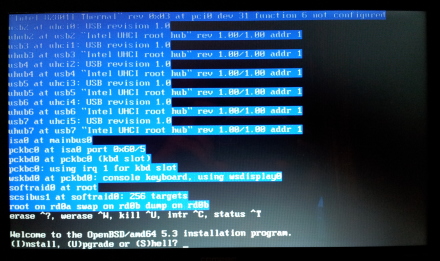
Enter I for Install.
We need to change the label on the third partition.
Enter E to edit the MBR.
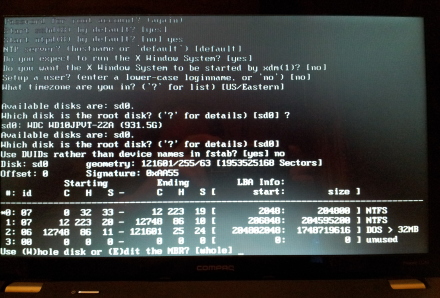
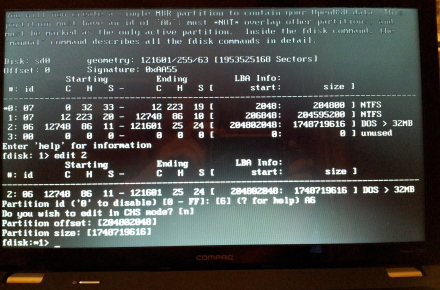
After the initial questions we get to the disk details.
Windows said the one disk was Disk 0 with partitions 1, 2 and 3.
OpenBSD says the one SATA disk is sd0 with partitions 0, 1 and 2 (plus, potentially, 4, although a fourth partition has not been defined).
Multiply the size column by 512 to get bytes, or divide by 2048 to get megabytes (or, strictly speaking, mebibytes).
Notice that partition #3 has an ID or type of 0x06,
meaning "DOS > 32MB".
We need to change this by editing the MBR.
Enter E to edit the MBR.
It will show you the partition table so far,
and you can always use the
print command.
Enter edit 2
to edit the MBR.
It starts by asking for the new partition ID.
Enter A6
for OpenBSD.
Then simply press
<Enter>
to accept the defaults: we don't want to edit anything in
CHS mode nor do we want to change the partition's offset
(starting point) or size.
Enter edit 2 to edit partition 2,
then 0xa6 means OpenBSD.
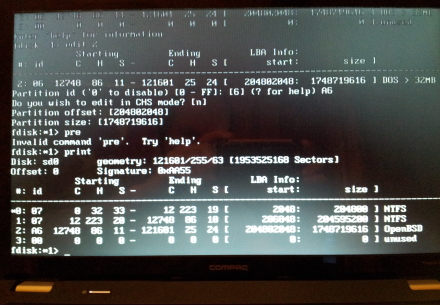
Verify that you modified it correctly.
Enter print
to verify that it worked.
As you can see,
pre
is not close enough to
print to work...
THis looks good, notice that partition #3 has been changed from 0x06/DOS to 0xa6/OpenBSD.
Enter write
to save your changes to the disk.
Then enter quit
to exit the partition table editing.
And here you thought that you were done with disks...
A standard OpenBSD installation uses the entire disk and creates a disk label to carve this up into slices, one for each file system plus a swap device.
Here, we are putting OpenBSD into a partition.
It will divide that partition into slices with its
disklabel tool.

This automatically allocated layout is OK as a starting point.
Above we see its automatically allocated layout.
This isn't precisely what I want,
it is only using about a third of the disk.
But I want to use all the spare space for
/home
and that is the last slice on the disk.
Look at the offset field,
/home
has the largest offset.
This means that I can expand that partition and file system
later.
Press <Enter>
to accept this automatically allocated layout.
Then it's just a matter of telling it to retrieve the
installation over HTTP, setting the
root password
and time zone, and so on.
Of course, the system's master boot record says to
use the boot block on the first partition, which will
simply boot Windows.
If we need to get into the OpenBSD side of things right
away, we can boot from the installation CD and type:
b sd0a:/bsd
at the boot prompt.
But let's fix the Windows boot loader first!
We will need a copy of the OpenBSD Partition Boot Record
or PBR, the boot block from the partition holding OpenBSD.
So, unless you remember to do this at the very end of the
installation, you will have to boot from the installation
CD and do the following.
Start by plugging in a USB stick formatted with VFAT or
similar.
This device will be recognized as
/dev/sd1.
Then:
# mount /dev/sd1i /mnt
# dd if=/dev/rsd0a of=/mnt/openbsd.pbr bs=512 count=1
# umount /mnt
Got it? Good. Now we're ready to modify the Windows boot loader. Reboot and let it bring up Windows.
Modify the Boot Loader
We must start by putting that OpenBSD boot block somewhere that Windows can find it. Windows ignores the first partition, considers the second partition to be its C: drive, and has no idea of what to do with the data in its D: drive, the OpenBSD partition. Plug in that USB stick, it will be E: Then start a command prompt by right-clicking on it in the Start menu and selecting Run as administrator, and use the command sequence shown here to put it somewhere out of the way but clearly labeled so you're less likely to forget what it is and remove it:
c:\Windows\System32> cd \
c:\> mkdir boot
c:\> copy e:openbsd.pbr boot
The old
C:\boot.ini
configuration file for the NTLDR boot loader disappeared
after Windows XP.
Starting with Vista, a Boot Configuration Store
or BCD data store controlls the boot logic.
Instead of editing the text
boot.ini you run
the
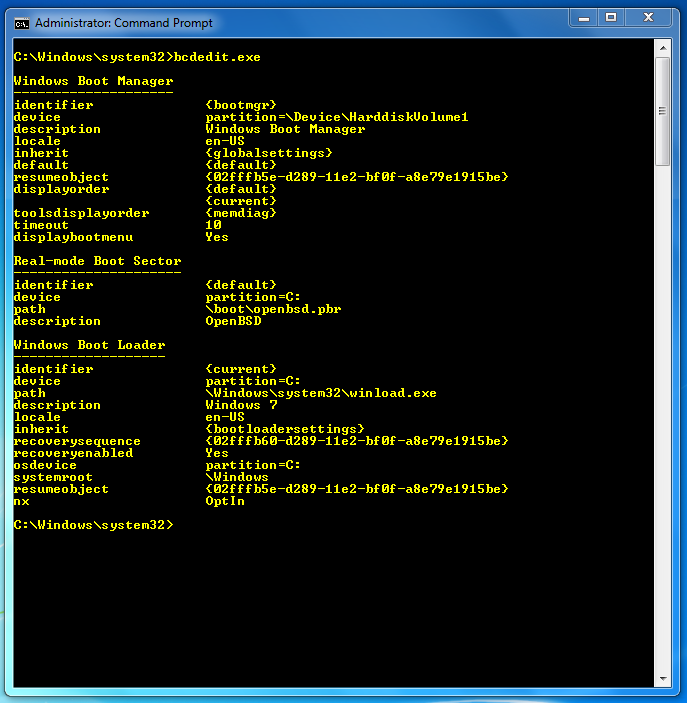
bcdedit
command-line utility.
The precise syntax needed varies, this page shows you how to multiboot OpenBSD with Windows 7. For Vista or Windows 8 or another version, see the OpenBSD Installation Guide.
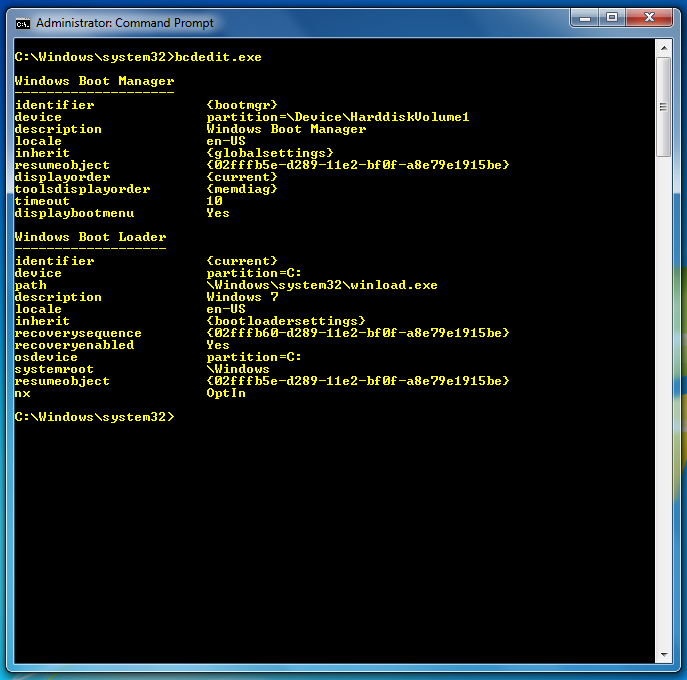
Here we see the Boot Configuration Store as it exists right after the two operating system installations. Of course, Windows has no idea about the second one.
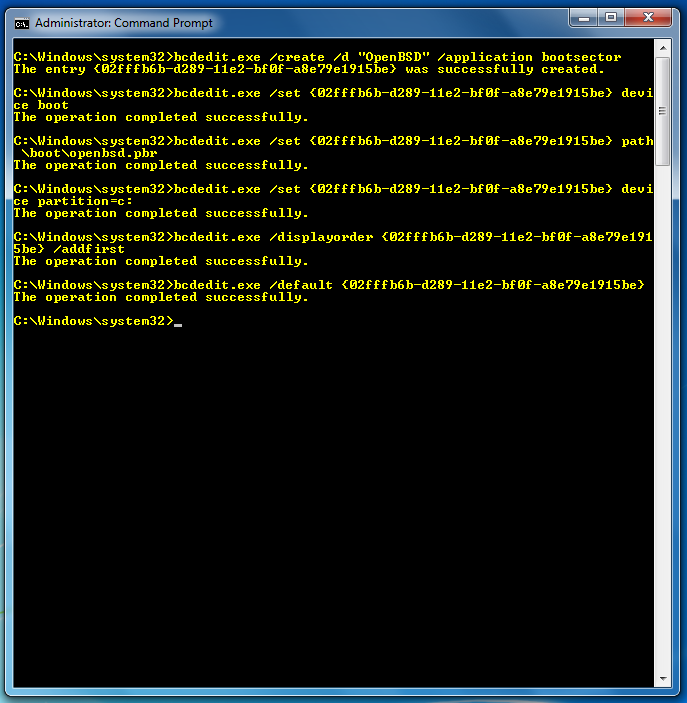
Here is the very Windows-7-specific syntax
for adding a second bootable operating system,
calling it "OpenBSD",
referring to
c:\boot\openbsd.pr,
and making it first in the list and the default.
Add another command specifying:
/timeout 10
to shorten the time from its default 30 seconds to 10.
Note very carefully that you must read the output of the first command, and then use the GUID that you get for all the other commands in place of the GUID you see here.
Let's make sure that's clear.
The syntax of these commands is correct but you must change the GUID from my 02fffb6b-d289-11e2-bf0f-a8e79e1915be to the unique value you see in the first command's output on your system.
Let's use the bcdedit
command to see what we got.
The graphical EasyBCD command is available.
As so often happens when comparing graphical to command-line tools, EasyBCD makes simple tasks easy, but more sophisticated tasks get much harder or aren't even possible.
At least with EasyBCD version 2.2, the latest available when I first did this, OpenBSD wasn't really supported as one of the non-Windows operating systems. It can, however, present what you already did with the command-line interface.
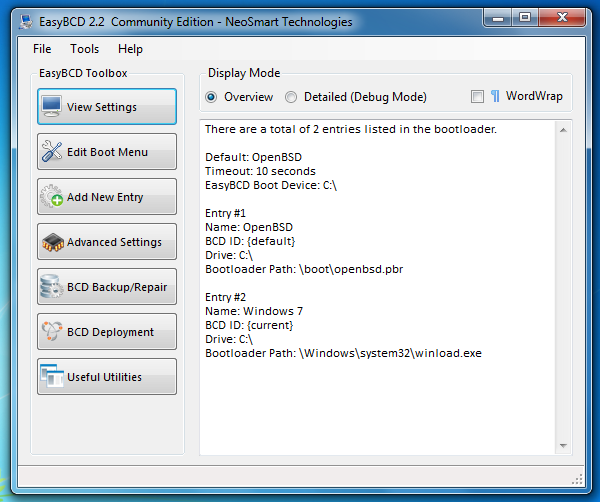
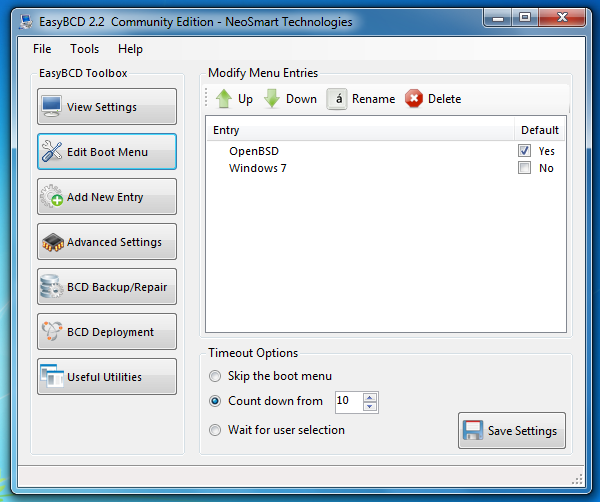
Simpler tasks are possible with EasyBCD.
You can easily change the order in the menu, change the default choice, or change the timeout or simply wait until the user selects an operating system.
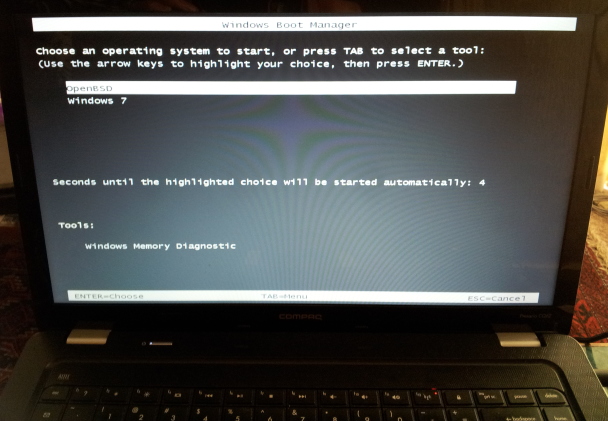
Mission accomplished!
Well, at least as far as the multi-booting. I still need to do a few things on the OpenBSD side.
First, enlarge that last slice m.
Then, expand the /home
file system mounted there.
After that, install the same set of packages we had on the previous system.
Then, recreate my user account and install my files.
Expanding the /home Partition and File System
Use the
disklabel
command to edit the OpenBSD disk.
Use the
-E option
for "edit".
Use the p
command to print the existing table.
Use the c m
command to change slice m.
It tells you the maximum size, but by default it makes no change. You must type in the desired size.
Notice that you can use
p m to
print the table with the sizes in megabytes instead of sectors.
You can also use
m or
g
to specify the new size in megabytes or gigabytes,
but things get rounded off.
Since I wanted to use all the space, I simply specified
all the possible sectors.
Write the changes to the disk label with
w
and then quit with
q.
The slice is larger, but now you need to grow the file system out to fill it.
Unmount the file system with
umount.
Use growfs
to grow the file system.
Run the file system consistency check, mount it, and make sure it worked.
openbsd# disklabel -E sd0
Label editor (enter '?' for help at any prompt)
> p
OpenBSD area: 204802048-1953521664; size: 1748719616; free: 32
#                size           offset  fstype [fsize bsize  cpg]
  a:          2097152        204802048  4.2BSD   2048 16384    1 # /
  b:          6671136        206899200    swap                   # none
  c:       1953525168                0  unused
  d:          8388608        213570336  4.2BSD   2048 16384    1 # /tmp
  e:         20682304        221958944  4.2BSD   2048 16384    1 # /var
  f:          4194304        242641248  4.2BSD   2048 16384    1 # /usr
  g:          2097152        246835552  4.2BSD   2048 16384    1 # /usr/X11R6
  h:         20971520        248932704  4.2BSD   2048 16384    1 # /usr/local
  i:           204800             2048    NTFS
  j:        204595200           206848    NTFS
  k:          4194304        269904224  4.2BSD   2048 16384    1 # /usr/src
  l:          4194304        274098528  4.2BSD   2048 16384    1 # /usr/obj
  m:        631612837        278292864  4.2BSD   4096 32768 11888 # /home
> c m
Partition m is currently 631612837 sectors in size, and can have a maximum
size of 1675228800 sectors.
size: [631612837] 1675228800
> p
OpenBSD area: 204802048-1953521664; size: 853867.0M; free: 0.0M
#                size           offset  fstype [fsize bsize  cpg]
  a:          1024.0M        204802048  4.2BSD   2048 16384    1 # /
  b:          3257.4M        206899200    swap                   # none
  c:        953869.7M                0  unused
  d:          4096.0M        213570336  4.2BSD   2048 16384    1 # /tmp
  e:         10098.8M        221958944  4.2BSD   2048 16384    1 # /var
  f:          2048.0M        242641248  4.2BSD   2048 16384    1 # /usr
  g:          1024.0M        246835552  4.2BSD   2048 16384    1 # /usr/X11R6
  h:         10240.0M        248932704  4.2BSD   2048 16384    1 # /usr/local
  i:           100.0M             2048    NTFS
  j:         99900.0M           206848    NTFS
  k:          2048.0M        269904224  4.2BSD   2048 16384    1 # /usr/src
  l:          2048.0M        274098528  4.2BSD   2048 16384    1 # /usr/obj
  m:        817982.8M        278292864  4.2BSD   4096 32768 11888 # /home
> w
> q
# umount /home
# growfs /dev/sd0m
We strongly recommend you to make a backup before growing the Filesystem

 Did you backup your data (Yes/No) ? Yes
[ ...much narrative output deleted... ]
# fsck /dev/rsd0m
** /dev/rsd0m
** Last Mounted on /home
** Phase 1 - Check Blocks and Sizes
** Phase 2 - Check Pathnames
** Phase 3 - Check Connectivity
** Phase 4 - Check Reference Counts
** Phase 5 - Check Cyl groups
87709 files, 434597 used, 595930 free (562 frags, 74421 blocks, 0.1% fragmentation)

MARK FILE SYSTEM CLEAN? [Fyn?] y

***** FILE SYSTEM WAS MODIFIED *****
# mount -a
# df -h
Installing the Same Set of Packages
Remember that
package-list file?
That was a list of all the installed packages on the
old system.
The thing is, I had gone through a couple of upgrades
and there were likely some packages that weren't the
latest and most fully debugged.
So, I want to select packages by name alone and not
name and version.
Hence the
sed
command to strip off
dash-digit and all following characters.
Almost all of the packages with names starting
lib*
are libraries, of which the appropriate version will be
retrieved based on dependencies.
I'll keep them out of the list with the
grep command.
An exception here is the
libreoffice
package, so I'll explicitly list it.
# export PKG_PATH=ftp://ftp.openbsd.org/pub/OpenBSD/`uname -r`/packages/`uname -p`
# for PACKAGE in `sed 's/-[0-9].*//' package-list | grep -v '^lib'` libreoffice
> do
>   echo "$PACKAGE ================================"
>   pkg_add $PACKAGE
> done
Fixing the Clock
OpenBSD assumes that the hardware clock is set to UTC. Windows assumes it is set to the local time.
You can build your own kernel that accounts for this.
Or you could adjust an existing kernel.
Or you could simply let Windows use UTC.
Back to the Linux / Unix page
* I used OpenBSD on a laptop from 1997 until 2017. It started as a way to force myself to know a more secure UNIX variant, while allowing me to do so on very low-end used laptop hardware. The constant changes and toxic atmosphere drove me away,