
How to Install and Run Windows Within the QEMU Emulator on an OpenBSD or Linux Desktop
Running Windows in a Virtual Machine
The following describes how to run Windows in a virtual machine on any Linux distribution or on OpenBSD. This how-to includes all the details, including setting up networking. The method uses the QEMU virtual machine emulator. QEMU running on a Linux platform can take advantage of the KVM (or Kernel-based Virtual Machine) support within the Linux kernel for better performance.
I was using OpenBSD on my laptop at the time. Now I have given up on OpenBSD, but these directions should be useful on FreeBSD and Linux.
Once in a great while I need to do something with Windows.
Yes, LibreOffice and Gnumeric let me handle Microsoft Office documents just fine. That would seem to leave games as the only thing that Windows is really good for. But once in a while I need to figure out where Windows hides a certain piece of data, or just how Windows (mis)behaves in a certain situation, or I have to deal with a poorly written "web page" that isn't really a web page after all, it's nothing more than an Explorer page.

The solution would seem to be VMware, but it isn't available for the OpenBSD operating system. And even on Linux, VMware is very sensitive to kernel version and distribution. You might have to keep your system running older kernels and therefore older user-space packages to support VMware. And forget about running VMware on other hardware platforms, like the Alpha or UltraSPARC.
No problem — there is a much easier way to run Windows!
The OpenBSD-specific parts of the following are based on
the web page found
here
and this file:
/usr/local/share/doc/qemu/README.OpenBSD
with some corrections and updates and improvements.
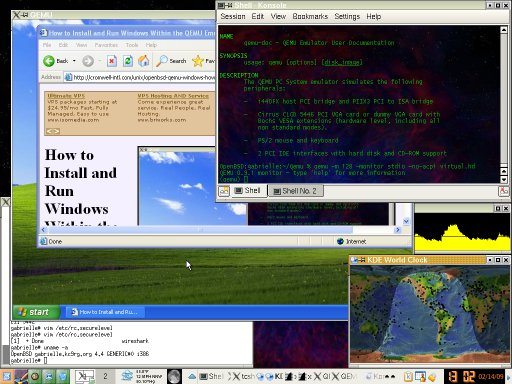
A KDE desktop on an OpenBSD laptop, with Windows XP running within a QEMU virtual machine. Within that XP VM, Explorer is viewing an early version of this page (in which you did not see Explorer viewing the page, and so on down to infinity).
Install QEMU and QEMU Kernel Support
Install the QEMU packages as needed.
They will probably have names
like qemu and qemu-img.
See my page on Unix package management
for more details on
how to add packages.
Find the package names with one of these:
Most RPM based Linux distributions:
   # yum list | grep qemu
Mageia Linux:
   # urpmq --list | grep qemu
Debian/Ubuntu Linux:
   # apt-get update
   # apt-cache dumpavail | grep -i 'package:.*qemu'
Install the packages with one of these, changing the list of package names as needed:
Most RPM based Linux distributions:
   # yum install qemu qemu-img
Mageia Linux:
   # urpmi qemu qemu-img
Debian/Ubuntu Linux:
   # apt-get install qemu-kvm qemu-kvm-extras
OpenBSD:
   # pkg_add qemu
Notice that package collections for past versions of OpenBSD,
at least on the i386 platform, have included a
QEMU kernel accelerator package kqemu.
However, QEMU versions starting with 0.12.0 support large
memory, making them incompatible with kqemu,
and newer versions of QEMU have dropped all kqemu
support.
Quoting from the QEMU development mailing list
from August, 2009:
kqemu introduces a number of restrictions on the i386 target. The worst is that it prevents large memory from working in the default build. Furthermore, kqemu is fundamentally flawed in a number of ways. It relies on the TSC as a time source which will not be reliable on a multiple processor system in userspace. Since most modern processors are multicore, this severely limits the utility of kqemu.
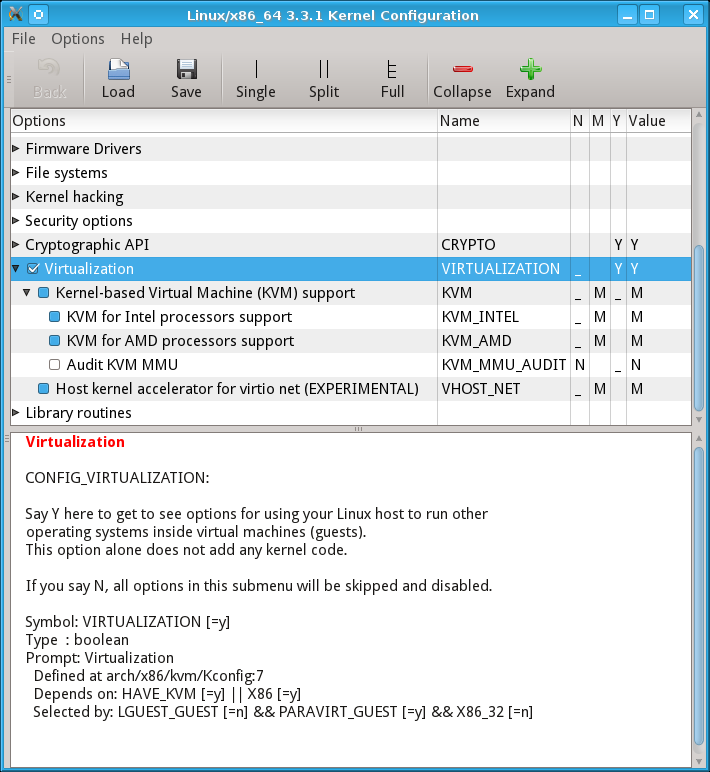
If you are building your own Linux kernel, be sure to include support for KVM, the Kernel-based Virtual Machine module of the Linux kernel.
Here you see a kernel build configuration underway,
with virtualization supported and loadable modules being
built for KVM for both Intel and AMD processors.
This builds three modules: kvm.ko,
kvm-amd.ko and kvm-intel.ko.
Convert an Existing VMware Image
Thanks to Bodhi Zazan for suggestions here!
Let's say you are starting with an existing VMware based virtual machine that you would like to keep. If not, skip to the next section.
The VMware products have probably led you to creating the disk image as a collection of files allowed to grow up to 2 GB each instead of one large disk image file. So, you see something like the following:
Linux:~/Qemu-Win7 % ls -sh
 1.9G Windows7-s001.vmdk   320K Windows7-s015.vmdk
 2.0G Windows7-s002.vmdk   320K Windows7-s016.vmdk
 2.0G Windows7-s003.vmdk   320K Windows7-s017.vmdk
 2.0G Windows7-s004.vmdk   320K Windows7-s018.vmdk
 2.0G Windows7-s005.vmdk   320K Windows7-s019.vmdk
 2.0G Windows7-s006.vmdk   320K Windows7-s020.vmdk
1018M Windows7-s007.vmdk   128K Windows7-s021.vmdk
 214M Windows7-s008.vmdk    11M Windows7.log
 283M Windows7-s009.vmdk   4.0K Windows7.vmdk
 320K Windows7-s010.vmdk      0 Windows7.vmsd
 1.1G Windows7-s011.vmdk   8.0K Windows7.vmx
  23M Windows7-s012.vmdk   4.0K Windows7.vmxf
 320K Windows7-s013.vmdk    12K nvram
 320K Windows7-s014.vmdk
First, convert the multi-file disk image into a single file.
You will need the vmware-vdiskmanager program
from VMware Workstation or Server.
Notice that the parameter is the relatively small file
describing the collection of large disk image files,
Windows7.vmdk
and not the 21
Windows7-s0??.vmdk files:
Linux:~/Qemu-Win7 % vmware-vdiskmanager -r Windows7.vmdk -t 0 Windows7-1file.vmdk
This will take a long time and involve a lot of disk I/O, so be patient. The result is one large VMware file, 15 GB in this case. It's the first file in this listing:
Linux:~/Qemu-Win7 % ls -sh
  15G Windows7-1file.vmdk   320K Windows7-s014.vmdk
 1.9G Windows7-s001.vmdk    320K Windows7-s015.vmdk
 2.0G Windows7-s002.vmdk    320K Windows7-s016.vmdk
 2.0G Windows7-s003.vmdk    320K Windows7-s017.vmdk
 2.0G Windows7-s004.vmdk    320K Windows7-s018.vmdk
 2.0G Windows7-s005.vmdk    320K Windows7-s019.vmdk
 2.0G Windows7-s006.vmdk    320K Windows7-s020.vmdk
1018M Windows7-s007.vmdk    128K Windows7-s021.vmdk
 214M Windows7-s008.vmdk     11M Windows7.log
 283M Windows7-s009.vmdk    4.0K Windows7.vmdk
 320K Windows7-s010.vmdk       0 Windows7.vmsd
 1.1G Windows7-s011.vmdk    8.0K Windows7.vmx
  23M Windows7-s012.vmdk    4.0K Windows7.vmxf
 320K Windows7-s013.vmdk     12K nvram
Now we can use a QEMU tool to convert the one large disk image file to the qcow2 format. The option is "dash-capital-O" and not "dash-zero":
Linux:~/Qemu-Win7 % qemu-img convert -O qcow2 Windows7-1file.vmdk Windows7.qemu
Install Windows in a QEMU Emulator
If you successfully converted an existing Windows image as described in the above section, skip to the next section. However, if you need to start with a fresh installation of Windows, use this section. This was easier for me than some web pages suggested it would be. But just in case, I'll provide alternatives in case you need to work around problems.
First, let's put our Windows virtual machine somewhere
we can easily find it without cluttering things up.
The location ~/windows made sense to me:
% cd
% mkdir windows
% cd windows
Now create an empty disk image.
8 GB was going to be more than enough
for what I wanted to do.
It might be nice to have an image that would fit on one
single-layer DVD, so 4500M could have been a
better choice than 8G for the size specification
if I had been certain that what I needed to do would
have fit into that space.
% qemu-img create -f qcow2 virtual.hd 8G

    create     = What we're doing, creating a new disk image
    -f qcow2   = Most versatile format, supporting sparse file
                systems, AES encryption, zlib-based compression,
                and multiple VM snapshots
                  "cow" = "copy on write",
                  "q" = "qemu",
                  "2" = version 2, not the older and
                        less capable "qcow"
    virtual.hd = The name of the image file to create
    8G         = 8 gigabytes
Unlike some people, I had no trouble getting qemu
to boot from a physical drive.
I simply put a Windows XP install DVD in the drive and
used that.
However, if for some reason that didn't work,
you could always use
k3b
or similar to create an ISO image of that DVD.
That could even be done on another system and shared over NFS.
I suspect that their problem might have been caused by
ownership and permissions on the CD/DVD device itself.
Compare the owner, group, and permissions reported by:
% ls -l /dev/cd0a
to your credentials reported by:
% id
and adjust as needed.
OK, let's do the initial installation:
% qemu -m 512 -cdrom /dev/cd0a -boot d -monitor stdio -no-acpi virtual.hd

    -- or, if that doesn't work, something like this --

% mkdir /tmp/nfs
% su root -c 'mount server:/home/cromwell /tmp/nfs'
% qemu -m 512 -cdrom /tmp/nfs/xp.iso -boot d -monitor stdio -no-acpi virtual.hd

    -m 512               = Let the virtual machine have 512 MB of RAM.
                           This should be no more than half the
                           physical RAM in the system.
    -cdrom /path/to/dvd  = Specify the CD/DVD device or ISO image.
    -boot d              = Boot from device D, the CD/DVD.
    -no-acpi             = Disable the disfunctional ACPI.
    virtual.hd           = The file containing the virtual disk image.
Hey, look, it works! It's the Windows installation boot process running within a window on your OpenBSD desktop. Get it started and then go do something else for a while.
It will get to some point and want to reboot from the
partially installed hard drive.
Since we're running on a virtual disk image, we will have
to use qemu to tell it how to do that.
In the terminal emulator where you started qemu
you should be looking at a qemu prompt.
Type q and <enter> to effectively
power off the virtual machine.
Now leave the DVD in the drive (or the ISO image mounted)
and start qemu a little differently.
Notice that we are not passing the -boot d
parameter specifying a boot from the DVD device.
This example is from my OpenBSD laptop where
/dev/cd0a is the CD/DVD device.
The default boot device is the file virtual.hd,
QEMU's notion of the boot disk.
% qemu -m 128 -cdrom /dev/cd0a -monitor stdio -no-acpi virtual.hd

    -- or, if that doesn't work and the ISO image is still mounted --

% qemu -m 128 -cdrom /tmp/nfs/xp.iso -monitor stdio -no-acpi virtual.hd
Now get the secondary installation running, and go away and do something that takes even longer....
Once it's done installing, shut down Windows and quit the emulator. Then just start it the same way as shown above. I created a one-line shell script to save typing.
Options: ACPI (or not), Networking and Graphics
ACPI
Some combinations of host OS, guest OS and QEMU version
have required me to use the
-no-acpi option.
Networking
Scenario #1:
Hardware: Intel Celeron 900 @ 2.2 GHz, 3 GB RAM
Host OS: OpenBSD 5.0 / amd64 with QEMU 0.14.1p4
Guest OS: Windows XP SP3 (IA32 version)
Add this line to the end of /etc/rc.local
to set up a bridge between the QEMU VLAN and
the physical Ethernet interface, changing
re0 as needed to the name of your Ethernet
device:
/etc/qemu-ifup re0
Put the people who will run QEMU in group wheel and
run these commands to allow them to access the network
tunnel devices:
# chgrp wheel /dev/tun?
# chmod g+rw /dev/tun?
# ls -l /dev/tun*
crw-rw----  1 root  wheel   40,   0 Apr  9 14:26 /dev/tun0
crw-rw----  1 root  wheel   40,   1 Mar 30 16:58 /dev/tun1
crw-rw----  1 root  wheel   40,   2 Mar 30 16:58 /dev/tun2
crw-rw----  1 root  wheel   40,   3 Mar 30 16:58 /dev/tun3
crw-r--r--  1 root  wheel   49,  16 Mar 30 16:58 /dev/tuner0
Now you are ready to start the virtual machine:
% qemu -m 512 -monitor stdio -net nic,model=pcnet -net tap,vlan=0 virtual.hd &

    -m 512               = Let the virtual machine have 512 MB of RAM.
                           This should be no more than half the
                           physical RAM in the system.
    -monitor stdio       = This terminal emulator is now dedicated to
                           monitoring QEMU.  Preface this command with
			   xterm -e
                           to start a new dedicated terminal emulator.
    -net nic,model=pcnet = The VM will see one PCNet Ethernet NIC
    -net tap,vlan=0      = The virtual NIC will be connected to the
                           QEMU VLAN, which the script /etc/qemu-ifup
                           has bridge to a physical Ethernet interface.
    virtual.hd           = The file containing the virtual disk image.
This allows ping and tracert to work
from the Windows virtual machine along with TCP
client applications.
It will be able to reach everything except
the host OS.
Scenario #2:
Hardware: AMD Phenom II X4 965 @ 3.4 GHz, 8 GB RAM
Host OS: Linux 3.3.1 with QEMU 0.15.0
Guest OS: Windows XP SP3 (IA32 version)
This machine is my gateway to the Internet and it has two
Ethernet interfaces.
The external interface is eth0, with an IP
address, netmask and default route set by the ISP.
The internal interface is eth1, 10.1.1.100/24.
The plan is to bridge the QEMU VLAN to the internal interface,
eth1, and have at least TCP connectivity to systems
on the internal 10.1.1/24 LAN and out on the Internet.
This means that a bridge interface br0 will appear,
and it will be used in place of eth1 as this
system's internal interface.
The firewall rules used for
masquerading
or
NAT
must be modified.
First, I need to create two files,
/etc/qemu-ifup:
#!/bin/sh

# stop DHCP, bounce eth1
/etc/init.d/dhcpd stop
ifdown eth1
ifconfig eth1 0.0.0.0 promisc up

# bring up tap device tap1
openvpn --mktun --dev tap1 --user root
ifconfig tap1 0.0.0.0 promisc up

# create bridge eth1 - tap1
brctl addbr br0
brctl addif br0 eth1
brctl addif br0 tap1

# turn off spanning tree
brctl stp br0 off

# bring up br0 / eth1
# ifconfig eth1 10.1.1.100/24
ifconfig br0 10.1.1.100/24
/etc/init.d/dhcpd start

# forward from the bridge through masquerading to the outside.
# previous FORWARD chain and related rules were set at boot time thusly:
#    iptables -P FORWARD DROP
#    iptables -t nat -F
#    iptables -t nat -A POSTROUTING -o eth0 -j SNAT --to-source ${EXT_IPADDR}
#    iptables -A FORWARD -m state --state ESTABLISHED,RELATED -j ACCEPT
#    iptables -A FORWARD -i eth1 -j ACCEPT
#    iptables -A FORWARD -i eth2 -j ACCEPT
# and so on for other internal interfaces.  since br0 just appeared
# as a new internal interface, add the corresponding rule:
iptables -A FORWARD -i br0 -j ACCEPT
and /etc/qemu-ifdown:
#!/bin/sh

# shut down the bridge and tunnel
brctl delif br0 tap1
brctl delif br0 eth1
ifconfig br0 down
brctl delbr br0
openvpn --rmtun --dev tap1
# bring eth1 back up
ifconfig eth1 10.1.1.100/24
/etc/init.d/dhcpd stop
/etc/init.d/dhcpd start
Then, add this line to /etc/sudoers by running
visudo
%wheel ALL= NOPASSWD: /etc/qemu-if*
Finally, create a shell script qemu-xp containing:
#!/bin/sh

cd ~/Qemu-XP
sudo /etc/qemu-ifup
xterm -e qemu -m 1024 -monitor stdio virtual.hd
sudo /etc/qemu-ifdown
Now I can start the virtual machine very simply by
running that qemu-xp shell script.
Started this way, TCP client applications can reach
everything including the host OS.
However, ping and tracert will not work,
possibly causing some confusion and frustration.
Here is the network configuration before running the
/etc/qemu-ifup script.
The output has been edited down to just show the relevant
details:
% ifconfig
eth0	Link encap:Ethernet  HWaddr 00:11:95:1E:8E:B6
	inet addr:98.223.228.34  Bcast:255.255.255.255  Mask:255.255.252.0
	inet6 addr: fe80::211:95ff:fe1e:8eb6/64 Scope:Link
	UP BROADCAST RUNNING MULTICAST  MTU:1500  Metric:1

eth1	Link encap:Ethernet  HWaddr 6C:62:6D:B2:F8:41
	inet addr:10.1.1.100  Bcast:10.1.1.255  Mask:255.255.255.0
	inet6 addr: fe80::6e62:6dff:feb2:f841/64 Scope:Link
	UP BROADCAST RUNNING PROMISC MULTICAST  MTU:1500  Metric:1

lo	Link encap:Local Loopback
	inet addr:127.0.0.1  Mask:255.0.0.0
	inet6 addr: ::1/128 Scope:Host
	UP LOOPBACK RUNNING  MTU:16436  Metric:1

% route -n
Kernel IP routing table
Destination     Gateway         Genmask         Flags Metric Ref    Use Iface
0.0.0.0         98.223.228.1    0.0.0.0         UG    0      0        0 eth0
10.1.1.0        0.0.0.0         255.255.255.0   U     0      0        0 eth1
98.223.228.0    0.0.0.0         255.255.252.0   U     0      0        0 eth0
169.254.0.0     0.0.0.0         255.255.0.0     U     1002   0        0 eth0
And now, the network configuration after running the
/etc/qemu-ifup script, while the QEMU VM
is running:
br0	Link encap:Ethernet  HWaddr 6C:62:6D:B2:F8:41
	inet addr:10.1.1.100  Bcast:10.1.1.255  Mask:255.255.255.0
	inet6 addr: fe80::6e62:6dff:feb2:f841/64 Scope:Link
	UP BROADCAST RUNNING MULTICAST  MTU:1500  Metric:1

eth0	Link encap:Ethernet  HWaddr 00:11:95:1E:8E:B6
	inet addr:98.223.228.34  Bcast:255.255.255.255  Mask:255.255.252.0
	inet6 addr: fe80::211:95ff:fe1e:8eb6/64 Scope:Link
	UP BROADCAST RUNNING MULTICAST  MTU:1500  Metric:1

eth1	Link encap:Ethernet  HWaddr 6C:62:6D:B2:F8:41
	inet6 addr: fe80::6e62:6dff:feb2:f841/64 Scope:Link
	UP BROADCAST RUNNING PROMISC MULTICAST  MTU:1500  Metric:1

lo	Link encap:Local Loopback
	inet addr:127.0.0.1  Mask:255.0.0.0
	inet6 addr: ::1/128 Scope:Host
	UP LOOPBACK RUNNING  MTU:16436  Metric:1

tap1	Link encap:Ethernet  HWaddr 8E:5A:F4:C8:8C:E1
	UP BROADCAST PROMISC MULTICAST  MTU:1500  Metric:1

% route -n
Kernel IP routing table
Destination     Gateway         Genmask         Flags Metric Ref    Use Iface
0.0.0.0         98.223.228.1    0.0.0.0         UG    0      0        0 eth0
10.1.1.0        0.0.0.0         255.255.255.0   U     0      0        0 br0
98.223.228.0    0.0.0.0         255.255.252.0   U     0      0        0 eth0
169.254.0.0     0.0.0.0         255.255.0.0     U     1002   0        0 eth0
Scenario #3:
Hardware: AMD Phenom II X4 965 @ 3.4 GHz, 8 GB RAM
Host OS: Linux 3.3.1 with QEMU 0.15.0
Guest OS: Windows 7 (IA64 version)
As this is a 64-bit OS, I cannot use the qemu command.
If I try that, I get the ASCII-as-graphic "Windows is loading
files" error screen.
I also need to add the -vga std option.
A new slightly different script is needed.
Here is the qemu-win7 shell script.
#!/bin/sh

cd ~/Qemu-Win7
sudo /etc/qemu-ifup
xterm -e qemu-kvm -m 1024 -monitor stdio -vga std Win7.qemu
sudo /etc/qemu-ifdown
See the QEMU Networking Documentation page and also this page and this page for far more details on QEMU networking.
Networking on Windows within a QEMU Virtual Machine
I simply set up networking to use DHCP, as QEMU includes a tiny DHCP server! Go into the Control Panel, select Networking, then LAN Connection, its Properties, and TCP/IP. Then specify to get the IP address and the DNS server address automatically.
That resulted in the following promising output:
c:\>ipconfig /all

Windows IP Configuration

        Host Name . . . . . . . . . . . . : qemuxp    (or whatever....)
        Primary Dns Suffix  . . . . . . . :           (need to fix this....)
        Node Type . . . . . . . . . . . . : Unknown
        IP Routing Enabled  . . . . . . . : No
        WINS Proxy Enabled  . . . . . . . : No

Ethernet adapter Local Area Connection:

        Connection-specific DNS Suffix  . :
        Description . . . . . . . . . . . : Realtek RTL8029(AS)-based ....
        Physical Address  . . . . . . . . : 52-54-00-12-34-56
        DHCP Enabled . .  . . . . . . . . : Yes
        Autoconfiguration Enabled . . . . : Yes
        IP Address  . . . . . . . . . . . : 10.0.2.15
        Subnet Mask . . . . . . . . . . . : 255.255.255.0
        Default Gateway . . . . . . . . . : 10.0.2.2
        DHCP Server . . . . . . . . . . . : 10.0.2.2
        DNS Servers . . . . . . . . . . . : 10.0.2.2
        Lease Obtained  . . . . . . . . . : (just a few minutes ago...)
        Lease Expires . . . . . . . . . . : (tomorrow...)
The Realtek RTL8029(AS) emulation and the MAC address are defined by QEMU. 10.0.2.2 appears to the virtual machine to be its DNS server, DHCP server, and default gateway. Really that's the QEMU software.
However, things aren't quite working correctly yet.
DNS works, nslookup works just fine.
But the only thing you can contact via ping
or tracert or anything else is 10.0.2.2.
DNS works because QEMU is an application making calls
to the host operating system's resolver library.
It's QEMU that is generating and receiving the DNS queries
and replies out via the Ethernet interface.
But why are ping and tracert broken?
Sniffing packets with Wireshark reveals the mystery!
The ICMP packets used by ping and tracert
are being replaced by UDP port 7 (echo) packets by
Slirp,
used by QEMU and replacing the original network and
transport layer encapsulation.
My firewall isn't masquerading and passing UDP/Echo packets,
and I wouldn't expect other firewalls to do so, either.
TCP protocols like HTTP, FTP, and SSH work just fine.
I'll just have to remember that ping and
tracert just don't work from the virtual machine,
but that doesn't mean that networking is broken.
Everything works just fine if you have multiple interfaces on the host OS. QEMU is a user process running on that OS, and the operating system simply uses its routing table to decide which interface to use, and how. This seems to me like a huge improvement over VMware and its obsession about the first Ethernet interface. Click here for details about VMware networking and how to handle multiple physical interfaces in VMware.
See the QEMU Networking Documentation page and also this page and this page for far more details on QEMU networking.
Installing Office on that virtual Windows system
VMware Networking
How to install the QEMU emulator and Linux on a USB device, so you can run Linux within a window on a hosting machine running Linux or BSD or Windows
Back to the Linux / Unix page
You must realize that
tracertis already broken on Windows. Microsoft's faulty implementation of tracing routes uses ICMP packets and not UDP packets. This relies on the Internet infrastructure using ICMP to report on errors about ICMP. According to the formal definitions of the protocols, IP hosts should not do that and Microsoft'stracertshould not work at all. It seems that most everyone gave up and went along with the faulty design oftracert.