Controlling a Stereo with a 250-volt 100-amp Double-Pole Knife Switch
Power Your Stereo
An outlet strip can distribute power to multiple stereo
components,
and you can turn the components on and off with
their small push buttons.
But what's the point of appropriately-sized power controls?
Here is how to turn your stereo on and off safely with a
double-pole 250 VAC 100 amp knife switch
more suited for Frankenstein's laboratory.
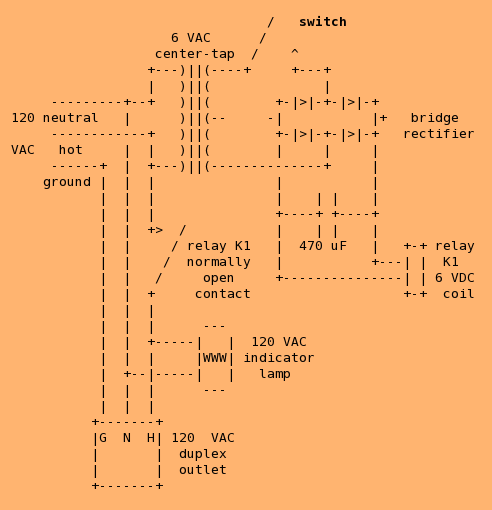
The circuit diagram is below.
The switch only controls six volts
used to energize the relay that really controls the power.
Parts
External components:
Overly large switch:
The one I used was salvaged out of a warehouse
that was about to be demolished.
It was used to disconnect the power
supply to the freight elevator.
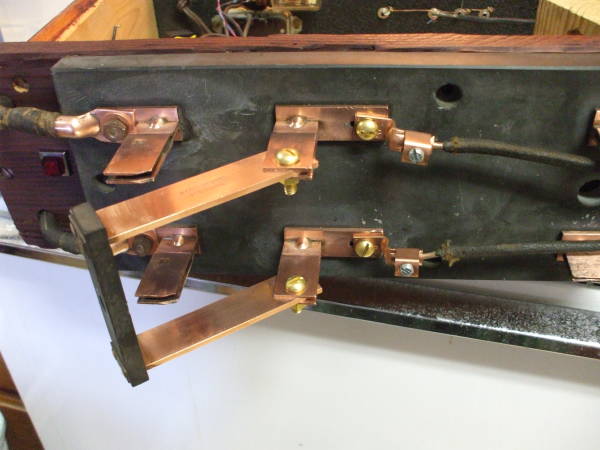
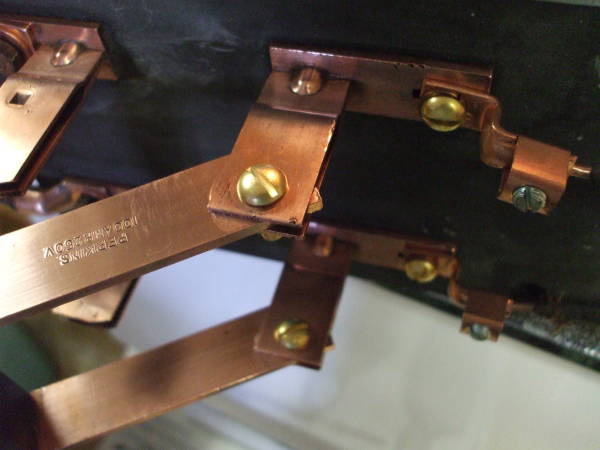
The copper contact bars are
22.5 mm wide by 3.5 mm thick
and they are stamped:
			   PERKINS

			 100 AMP 250V
I cleaned the copper with Brasso metal cleaner and polish, #0000 steel wool, and elbow grease. I then coated all the exposed copper except the contact surfaces of the two switch bars with varnish. Here and below you see it incompletely reassembled with the handle still not replaced.

Overly large wire, ideally with cloth insulation: I got my oversized wire with the switch, but house wiring from the 1940s or before could provide this. Some was #4 wire, the smaller was only #8. From the ARRL Handbook for Radio Amateurs copper wire tables:
-
#4 AWG (American Wire Gauge)
0.2043" (5.19 mm) diameter
59.6 ampere continuous-duty current capacity -
#8 AWG
0.1285" (3.26 mm) diameter
23.6 ampere continuous-duty current capacity
That should provide plenty of safety margin since they will only have to carry significantly less than 0.5 amperes.
Proportionally oversized terminals: Two wires were already connected to the switch with very large terminals. I added heavy-duty wire clamps for the other two.
Ceramic tube insulators: I got these from a house originally wired before the 1940s, part of what was called "post and tube" or "knob and tube" wiring. These are used where the heavy cloth-insulated wires pass through the front panel.
1/4"-32 brass hardware: To replace the original heavily corroded copper-washed steel washers, nuts, and machine screws.
Cabinet
The switch was built on a black soapstone base that had been fastened to a very weathered board. That board now forms the front of the cabinet.
The base and sides were made from nominal 3/4" lumber.
The top surface was covered with a piece of 1/4" luan underlayment, which is basically thin plywood made from a tropical wood.
Some screen mould and small outside-corner moulding for trim and to cover joints.
Cabot's red mahogany stain and some gloss-finish polyurethane varnish. Luan and dark stain can easily make for a nice finish.
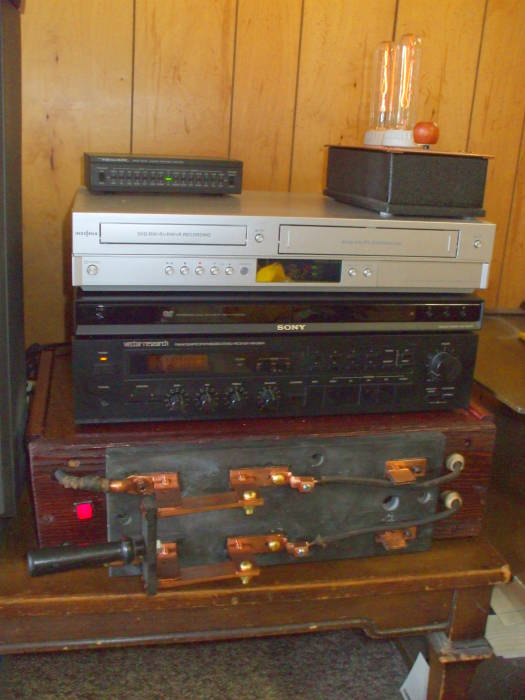
As you see here, the cheap modern cabinets and controls of the DVD/VCR deck, CD player, and receiver (top to bottom) look pretty inelegant in comparison to the dark wood and gleaming copper. These obviously cry out to be modified with new cabinets and control button covers constructed of dark-stained wood, brass and copper, and perhaps some dark green malachite pattern laminate material.
The lamp on top of the DVD/VCR deck is described on another page.
Since I have already taken the DVD/VCR deck apart and put it back together as another page shows, it's only a lack of motivation and time that is keeping me from modifying it to have a much more appropriate appearance.
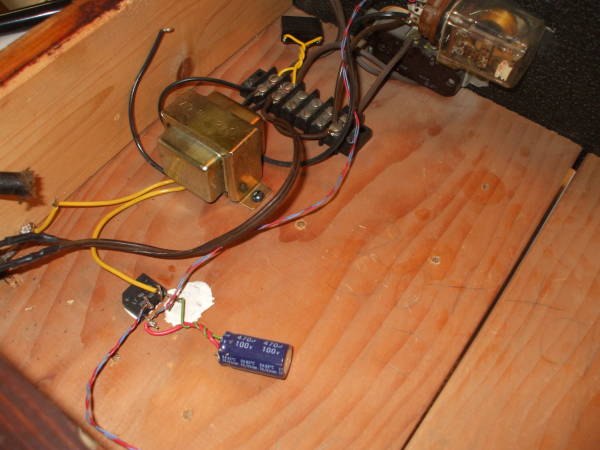
Internal components
We'll need a relay capable of switching 120 VAC at 15 amps with a low-voltage (ideally 6 volts or less) coil. The availability of a surplus relay pulled from some ham radio project drove the selection of some other components. This one had a 6 VDC coil, hence the choice of transformer and the need for the bridge rectifier and capacitor. It had an octal base like those on larger vacuum tubes. An octal tube socket was used to make the connections. We'll also need:
- 6 VAC 0.5 A center-tap transformer
- Bridge rectifier
- 470 uF 100 VDC capacitor
- Terminal strip
- Non-enormous wire for internal connections
- 120 VAC grounded duplex outlet
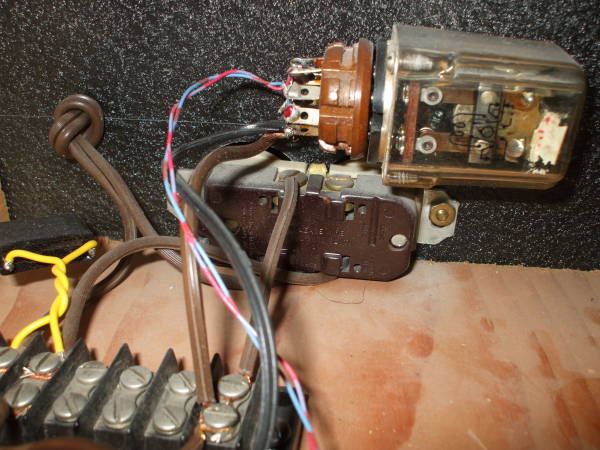
Only one of the two poles on the main switch is needed for switching. It can be difficult to solder to the #4 wire, use a large iron!
Although this power control is obviously very useful, and entirely practical, I have since built an even better power controller that incorporates power monitoring (metering on both voltage and current) and fully adjustable lighting.