
Building an OpenVAS Vulnerability Scanner on the Raspberry Pi
OpenVAS Vulnerability Scanning with the Raspberry Pi
The Raspberry Pi is an extremely low-cost yet highly capable Linux platform. It can be a very nice platform for a small security tool. OpenVAS is an open-source fork of the Nessus project. It is a sophisticated vulnerability scanning tool, with a large collection of publicly maintained test libraries plus the ability to write your own tests in the NASL scripting language.
While my examples and screen shots are from a Raspberry Pi, this page explains how to set up and use OpenVAS on any platform.
We need to install the needed software packages. Then, generate a server certificate and add a user, but we only have to do these two steps the first time. Then, update the plugin list and start the scanning service. Be patient, the enormous library of vulnerability scanning plugins makes those two steps take a while!
Then we're ready to start scanning our network for vulnerabilities!
Install the needed packages
Install the openvas-server package
This will also install the needed plugin packages
openvas-plugins-base and
openvas-plugins-dfsg,
and the needed library packages
libopenvas2 and
libopennasl2.
You also need to install openvas-client somewhere,
but it doesn't have to be on the same platform.
The OpenVAS scanning engine, known as the server, does the work of probing the network and testing nodes you want to scan.
The management console, known as the client, can run on another machine and connect to the server across the network.
Those are the package names on the Raspbian and Mageia distributions. On other distributions you may find it packaged differently, or you might even need to build it from source.
First Time Only: Generate a Server Certificate
Communication between the server (the scanning engine)
and the client (the management console) is secured with SSL.
You need to generate a certificate for this.
Use the openvas-mkcert script.
I will assume that you have tired of
typing sudo before every single command and
you have simply run bash or some other preferred
shell through sudo.
You will be asked a series of questions.
Simply pressing <Enter> accepts the default
shown in square brackets:
root@raspberrypi:~# openvas-mkcert

---------------------------------------------------------------------
              Creation of the OpenVAS SSL Certificate
---------------------------------------------------------------------

This script will now ask you the relevant information to create the SSL
certificate of OpenVAS.
Note that this information will *NOT* be sent to anybody (everything
stays local), but anyone with the ability to connect to your OpenVAS
daemon will be able to retrieve this information.


CA certificate life time in days [1460]:
Server certificate life time in days [365]: 1460
Your country (two letter code) [FR]: US
Your state or province name [none]: IN
Your location (e.g. town) [Paris]: West Lafayette
Your organization [OpenVAS Users United]:

Congratulations. Your server certificate was properly created.

/etc/openvas/openvasd.conf updated
The following files were created:

. Certification authority:
   Certificate = /var/lib/openvas/CA/cacert.pem
   Private key = /var/lib/openvas/private/CA/cakey.pem

. OpenVAS Server :
    Certificate = /var/lib/openvas/CA/servercert.pem
    Private key = /var/lib/openvas/private/CA/serverkey.pem

Press [ENTER] to exit

root@raspberrypi:~# ls -lR  /var/lib/openvas/CA/ /var/lib/openvas/private/
/var/lib/openvas/CA/:
total 12
-rw-r--r-- 1 root root 1525 Apr 23 11:47 cacert.pem
-rw-r--r-- 1 root root 4324 Apr 23 11:47 servercert.pem

/var/lib/openvas/private/:
total 4
drwxr-xr-x 2 root root 4096 Apr 22 21:11 CA

/var/lib/openvas/private/CA:
total 8
-rw------- 1 root root 891 Apr 23 11:47 cakey.pem
-rw------- 1 root root 887 Apr 23 11:47 serverkey.pem
First Time Only: Add an OpenVAS User
A user account needs to be defined on the server. Again, there is an easy-to-use script for this. Note that the user name does not need to correspond to any existing Linux user, and the password defined here is useful only for authenticating to the OpenVAS server process. You can ask for certificate based authentication, and specify a user certificate for the user.
root@raspberrypi:~# openvas-adduser Using /var/tmp as a temporary file holder. Add a new openvasd user --------------------------------- Login : cromwell Authentication (pass/cert) [pass] : Login password :Login password (again) :User rules --------------- openvasd has a rules system which allows you to restrict the hosts that cromwell has the right to test. For instance, you may want him to be able to scan his own host only. Please see the openvas-adduser(8) man page for the rules syntax. Enter the rules for this user, and hit ctrl-D once you are done: (the user can have an empty rules set) ^D Login : cromwell Password : *********** Rules : Is that ok? (y/n) [y] user added
Every Time: Update the OpenVAS Security Checks
New vulnerabilities are discovered every day, and so new tests for those newly discovered vulnerabilities are always appearing. Plugins implementing those tests can easily be downloaded from the OpenVAS site and installed with this command:
root@raspberrypi:~# openvas-nvt-sync
The above command will require a significant amount of time
as it will download and install tens of thousands of
security plugins.
Maybe 15 minutes or more even on a cable modem as over
300 megabytes of plugins are downloaded and stored under
/var/lib/openvas.
Start the OpenVAS Server
Let's start the scanning engine! You may see an error or two, caused in these cases by overly wordy vulnerability test designers. Again, given the size of the collection of plugins, expect this to take a while to get started. You clearly do not want to put this into a startup script unless OpenVAS scanning is the only purpose for your Raspberry Pi, or unless you start the daemon in the background.
root@raspberrypi:~# openvasd
freebsd_linux-flashplugin17.nasl: The length of the value for the property
	"description" exceeds the allowed maximum length (is 3724 characters,
	maximum length is 3192).
freebsd_linux-flashplugin17.nasl failed to load
freebsd_chromium.nasl: The length of the value for the property "cve_id"
	exceeds the allowed maximum length (is 2473 characters, maximum
	length is 1404).
freebsd_chromium.nasl failed to load
freebsd_chromium22.nasl: The length of the value for the property
	"description" exceeds the allowed maximum length (is 3332
	characters, maximum length is 3192).
freebsd_chromium22.nasl failed to load
find_service_nmap.nasl: The length of the value for the property
	"dependencies" exceeds the allowed maximum length (is 525
	characters, maximum length is 512).
find_service_nmap.nasl failed to load
gb_VMSA-2012-0005.nasl: The length of the value for the property "name"
	exceeds the allowed maximum length (is 137 characters, maximum
	length is 128).
gb_VMSA-2012-0005.nasl failed to load
[... 30 minutes or more passes ...]
All plugins loaded
Start the OpenVAS Client
I will do this from my desktop workstation.
me@linux-desktop:~$ OpenVAS-Client &
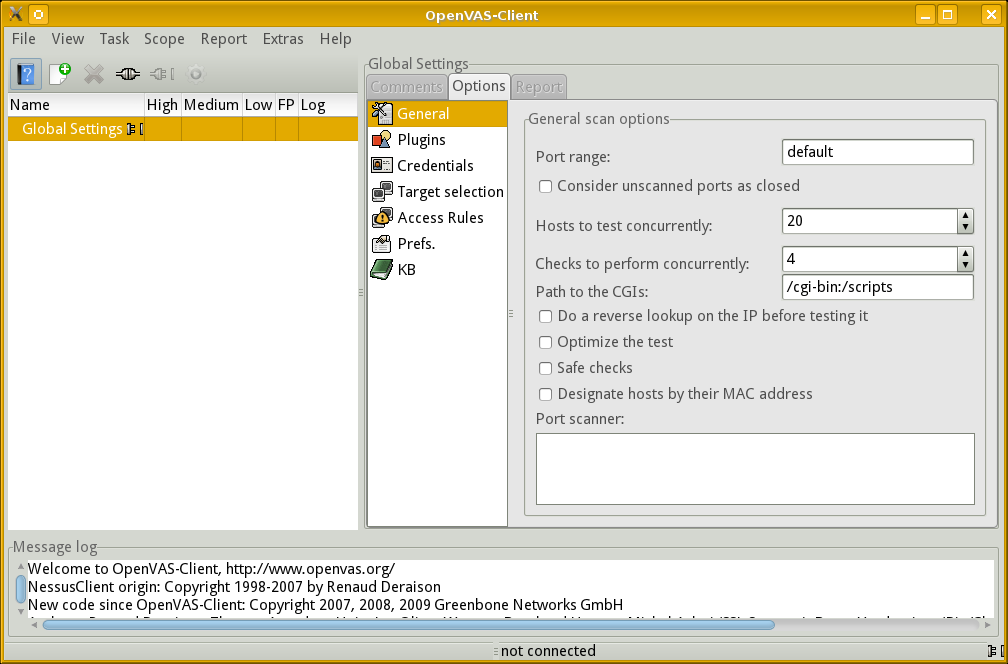
Configure an OpenVAS Scan
It is time to define a new task.
Select Task | New or simply click the New button, appearing like a white sheet with white/green "+". Then click "unnamed task" and change it to something meaningful.
This is simply the name of a scanning task. We need to define what it will do.
Select Scope | New. Then click "unnamed scope" and change it to something meaningful.
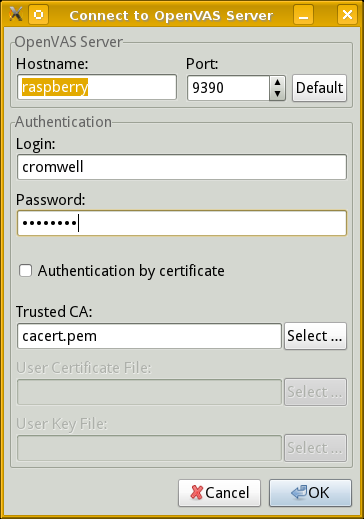
With your named scope selected, click File | Connect.
The following dialog will appear with the hostname set to
localhost by default.
Change that to the DNS name or IP address of your
OpenVAS server platform, then enter the login and
password for your scanner user.
Once again, be patient! The SSL connection and authentication actually happen very quickly, but the console doesn't refresh and you can't see that it is busily cataloging over 30,000 plugins.
This is a case where it is a good thing when
the client console appears to be "frozen".
Running top on the server will show that the CPU
is about 40% busy with the openvasd process.
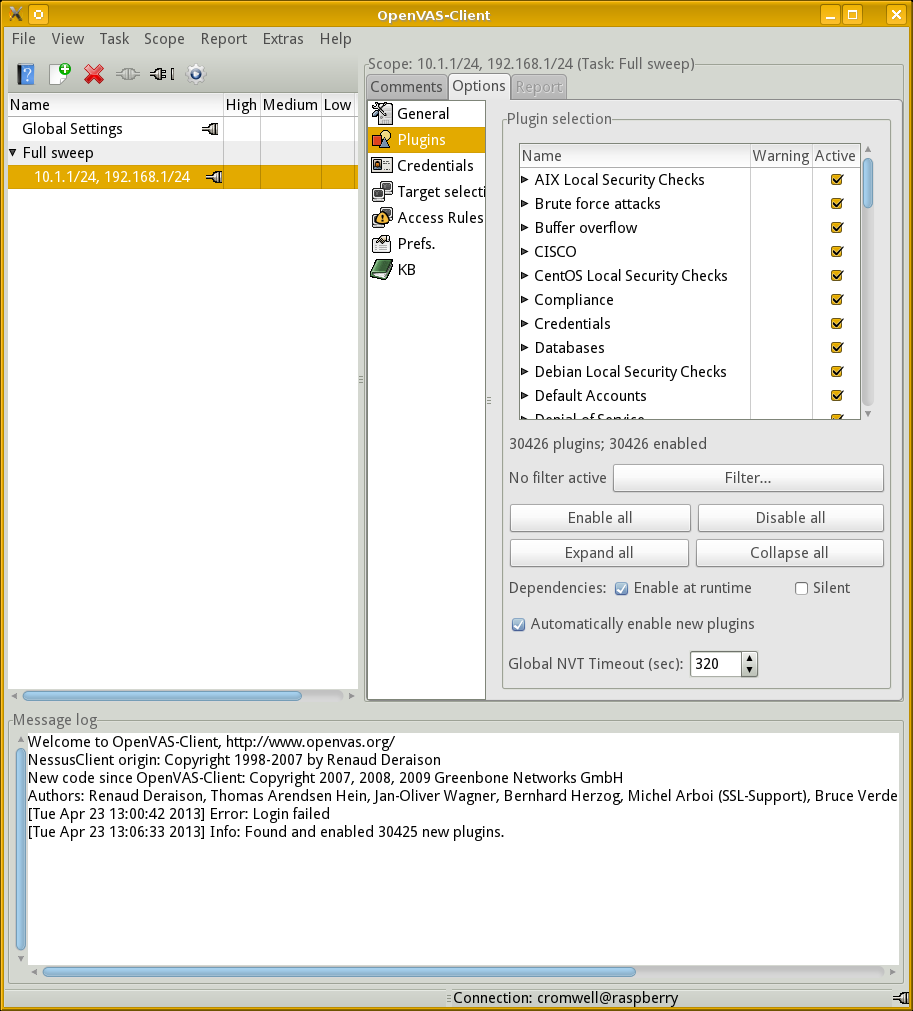
Eventually an information box will pop up announcing the number of enabled plugins, and the console window will refresh. Click "OK".
A list of dependencies will be transferred much more quickly, with the window refreshing and keeping you informed.
You will see the tree of plugins at upper right, click the triangles to expand that node in the tree.
You can see here that I arbitrarily named my task "Full sweep" and its scope "10.1.1/24, 192.168.1/24". Yes, the scope name serves as a reminder to me of what ranges of IP addresses it will scan, but the name is arbitrary. I still need to tell the scanner what targets to use.
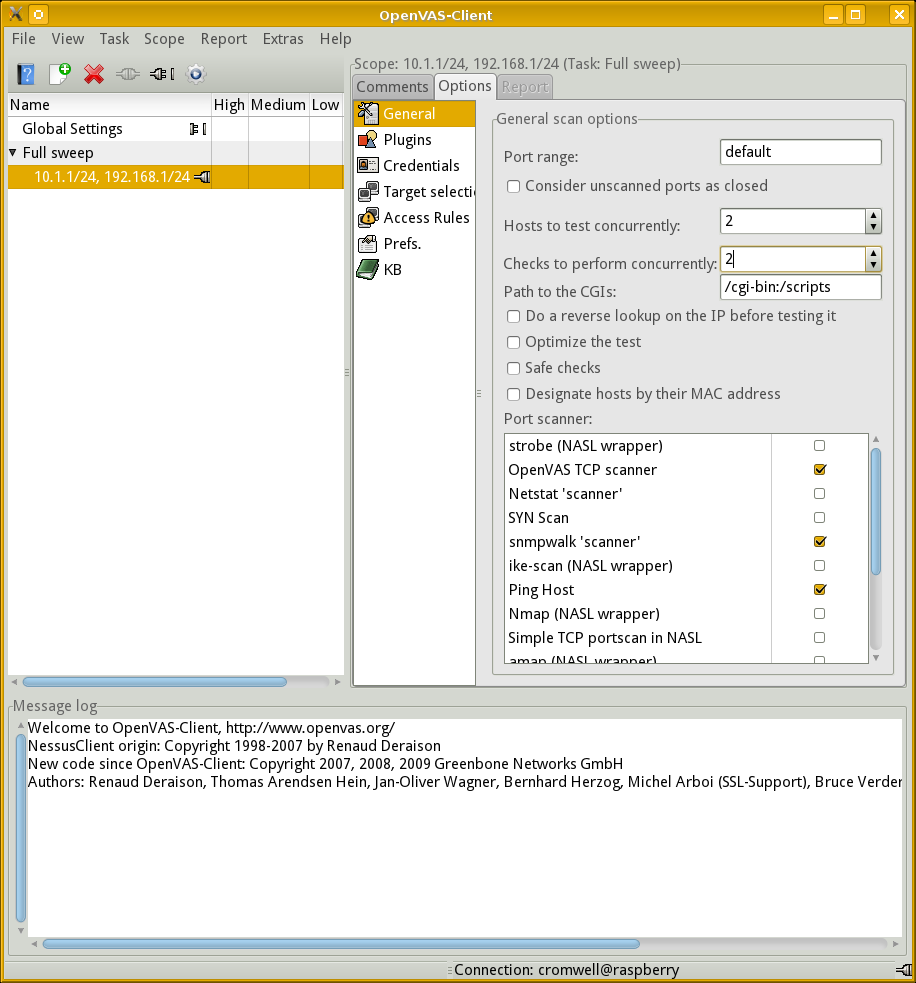
First, though, let's go to the General category.
We find that the scanner will use Ping and the
OpenVAS TCP scanner for port scanning.
Since my targets include some routers and VLAN switches,
I will add the scanner based on snmpwalk.
I will also change the settings for "Hosts to test concurrently" and "Checks to perform concurrently." By default they are 20 and 4, respectively. But remember that the Raspberry Pi has just one CPU, not terribly fast, and 512 MB of RAM. No good will come of a load average above 35!
I will dial these settings back to 2 and 2.
Next, go to the Credentials category.
We need to configure SSH authentication so local tests can be run.
I have specified using my existing account cromwell
and authenticating using an SSH key.
See my pages on SSH configuration for details on how to generate and use SSH keys.

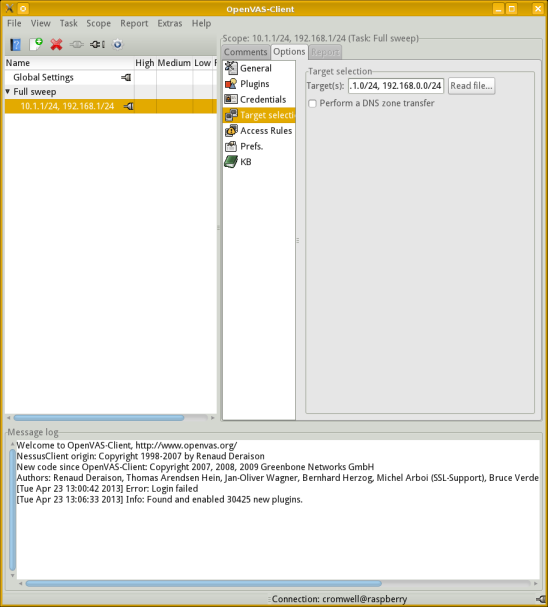
Select the Target selection category, and provide a list of target hosts to be scanned.
I have manually entered a list of IP addresses. Notice that you can read a list of hostnames or IP addresses from a file, or you can do a zone transfer from a DNS server.
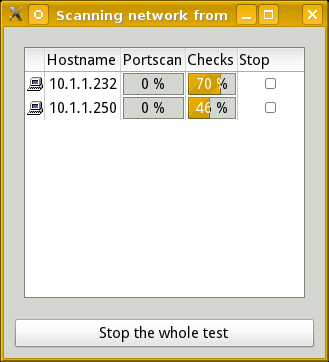
Run the Scan!
Expect to see a rather busy processor on the system running the scan, whether it is a Raspberry Pi or a high-end notebook or desktop. Here I'm running it on a single-core Raspberry Pi Model 1.
Amazon
ASIN: B01CD5VC92
The last 4% or so of the checks for a host may seem to
slow down if you are only watching the progress bar
and the host is running SSH and HTTP/HTTPS.
Use tail -f to follow the ends of the
log files /var/log/authlog and
/var/www/logs/error_log
or similar on the current targets.
You will observe a lot of relatively slow
SSH default password guessing followed by HTTP testing.
You may need to disable intrusion detection systems on the target hosts to make the tests most meaningful. Even with IDS turned off, your logging will become rather noisy during the test.
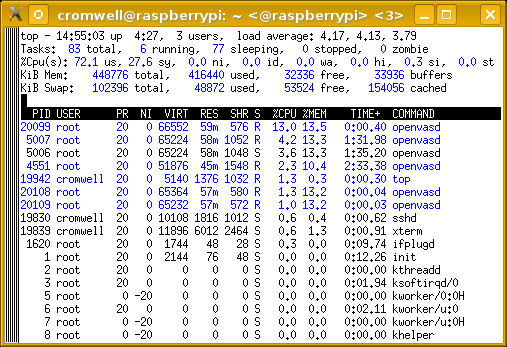
The top output at right shows that configuring the
server to run two tests on each of two hosts concurrently
has yielded a load average close to 4.
That's what we should expect.
Conventional wisdom says that about 4 runnable processes
per CPU core is about all you want to try to achieve.
Here is the output of vmstat after I have
removed the fairly useless first line showing the
average since boot time:
cromwell@raspberrypi ~ $ vmstat 10
procs -----------memory---------- ---swap-- -----io---- -system-- ----cpu----
 r  b   swpd   free   buff  cache   si   so    bi    bo   in   cs us sy id wa
 6  0  48872  39832  28496 163808    0    0     0     2  633  525 65 35  0  0
 3  0  48872  41128  28512 163860    0    0     0     2  649  515 69 31  0  0
 4  0  48872  41600  28528 162624    0    0     0    23  631  521 66 34  0  0
 5  0  48872  43500  28544 162676    0    0     0     2  653  522 68 32  0  0
 4  0  48872  40524  28560 162728    0    0     0     3  648  520 71 29  0  0
 1  0  48872  39384  28580 162776    0    0     0    23  659  494 69 23  0  7
 3  0  48872  39688  28596 162828    0    0     0     2  629  515 73 27  0  0
 4  0  48872  43204  28612 161168    0    0     0     2  657  529 72 28  0  0
 2  0  48872  43244  28628 161232    0    0     0    22  663  530 70 30  0  0
 4  0  48872  46656  28644 160048    0    0     0     4  624  530 62 38  0  0
 4  0  48872  47256  28660 156688    0    0     0     3  648  518 66 34  0  0
 3  0  48872  46752  28676 156732    0    0     0    24  636  503 72 28  0  0
^C
This looks good — the CPU never is idle, but at the same time it almost never is forced to wait while it is blocked for I/O because of overly aggressive paging. And we aren't swapping, which would be far worse!
If you leave the test aggressiveness set at 4 tests each on 20 hosts concurrently, you will see swapping and a huge slowdown in overall progress through the test. Unless you are only attempting a very limited test, this slowdown will be followed by failure as the kernel kills processes as memory is exhausted. You don't want to see the following in your syslog output, but you will if you don't dial back the default settings:
Apr 23 13:56:53 raspberrypi kernel: [12584.034272] Out of memory:
		Kill process 31503 (openvasd) score 76 or sacrifice child
Apr 23 13:56:53 raspberrypi kernel: [12584.034287] Killed process 31503
		(openvasd) total-vm:64500kB, anon-rss:53688kB, file-rss:0kB
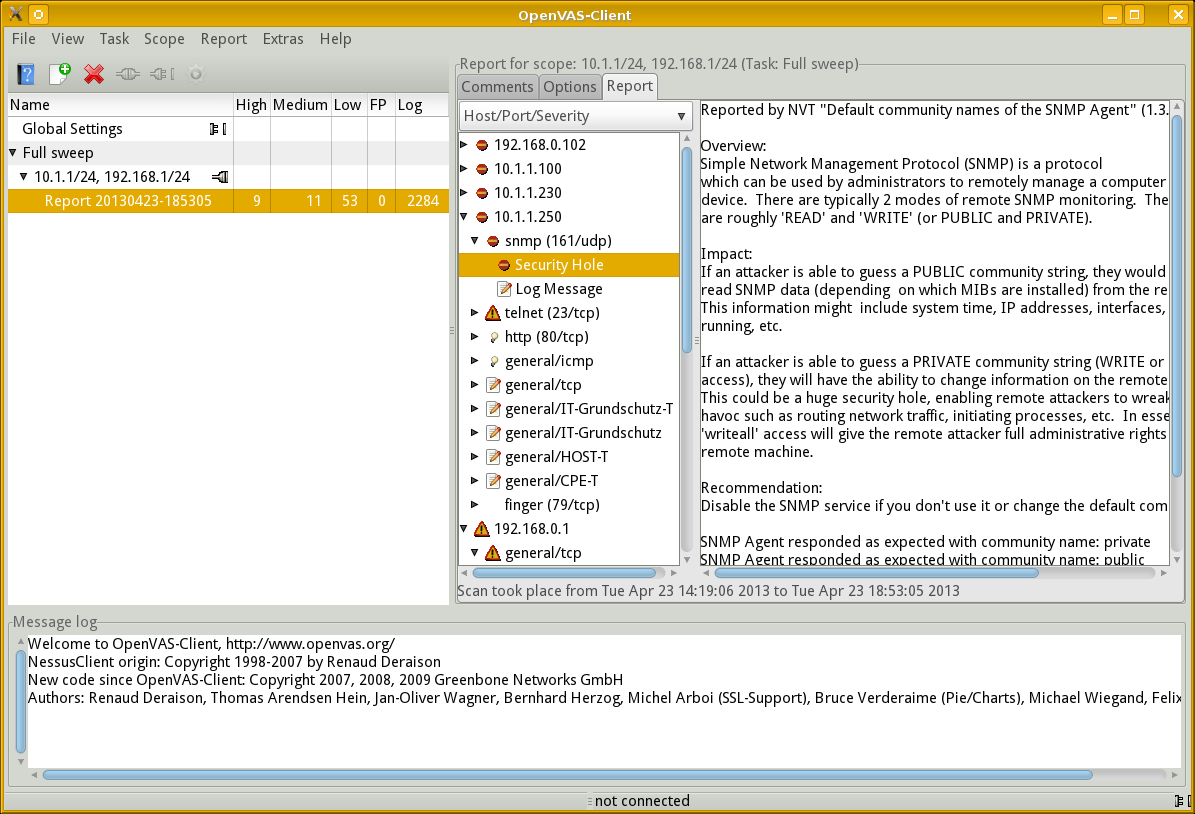
Examine the Results
The report is presented as an expandable tree. Click on the triangle beside an IP address to expand its report, and so on for the protocols and other details.
Above we see the report details for host 10.1.1.250, the SNMP protocol running on UDP port 161, and some explanation about what was found.
The report can be exported in NBE, the native Nessus format, or in XML, HTML, LaTeX, ASCII text, or Postscript.
See the OpenVAS documentation for all the details on using OpenVAS.
Select a Raspberry Pi topic:
Which model and how much memory?
$ cat /sys/firmware/devicetree/base/model
$ grep MemTotal /proc/meminfo

Amazon B07XTRFD3Z